|
| Author | Thread |
|
|
02/18/2009 08:55:22 AM · #1 |
I spent quite a bit of time on this post over on another thread that's not drawing much traffic, and I thought it might be of somewhat broader use, so, NEW THREAD:
*********************
Here's a quick tutorial on the zone system and HDRI:
A middle gray is Zone V. A dark-but detailed gray is Zone IV. A light but detailed gray is Zone VI. A near-black with traces of detail is Zone III. A near-white with traces of detail is Zone VII. II and below, VIII and above, have nothing in them, for all practical purposes.
Count 'em up: 3,4,5,6,7: you have basically a 5-stop range in which you have to compress all your detail, and a 7-stop range between pure black and pure white.
So IF you could go right up to subject and meter areas of even tonality precisely, let's see this little scenario: you're shooting a whitewashed old church in direct sunlight, and you can see one lit side and one full-shadow side. The church is clad in clapboards, so it has a lot of detail that you need to bring out. Meanwhile, there is stuff in the windows that you want to make out, but they are otherwise black empty holes for you.
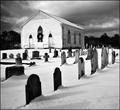 (kinda like this, except the controlling bright tones were the snow) (kinda like this, except the controlling bright tones were the snow)
So you meter the white side of the church, and the meter gives you a reading of, let's say, f/11 at 1/500.
Now, that reading, if you follow it, will give you a GRAY rendition of the white wall, because the meter assumes it is pointed at something of Zone V gray reflectance. So you need to adjust mentally: to "place" wall on Zone VII, which is where you want it, the exposure should be two stops MORE than indicated, which translates into f/11 at 1/125.
With me so far?
Then you meter the shaded side of the church, which you want on Zone IV, and it gives you, let's say, f/11 at 1/30. That's your Zone V exposure, and you want less than that by 1 stop, so you figure f/11 at 1/60 is the correct exposure for the shaded wall of the church.
So immediately you see that the the correct exposure for the shade overexposes the bright wall, and the correct exposure for the bright wall underexposes the shade.
Now you check out the window, and you find that your Zone III exposure for the window detail (metered exposure minus two stops) is f/11 at 1/60.
So this is a simple problem, you have a tonal range that's one stop too contrasty for what you want to do. So you make 3 exposures: one at f/11 and 1/125, one at f/11 at 1/90, and one at f/11 and 1/60. You now have an exposure that places the brights, another that places the darks, and one that splits the difference. And you merge them, and you now have a full tonal range in the merged image, with nothing too dark and nothing too light.
If you have a greater range, say a two-stop excess, you can do a -1, a 0, and a +1 or, if you want to be very precise, you can do 5 exposures and nail the half-stops as well.
With a three-stop excess, you run half-stop increments from + 1 1/2 to - 1 1/2, 7 exposures. In general, any time your spread is MORE than a stop between exposures, HDR is going to be problematic.
Now, in real life you need to eyeball this basically, unless you have a camera that has TTL spot-metering capability or a hand-held spot meter. But this is digital, and "film" is cheap right? So you can just rack off a whole BUNCH of exposures at half-stop increments and then choose the ones you need to use later, so it's not a biggie.
But here's the key thing: if you include in your merge images that are either brighter or darker than the brightest/darkest rendering you want in the finished product of the respective areas, your HDRI will get worse, not better. It will be too flat. Your brightest exposure in the merge will be the one that makes your dark areas look right, and your darkest exposure in the merge will be the one that makes the bright areas look right. Any exposure outside those extremes should not be used.
Hopefully, this will help you get headed in the right direction with your conceptualizing. Good HDRI, like good Zone System, requires previsualization at the time of exposure for best results.
R.
Message edited by author 2009-02-18 08:55:51.
|
|
|
|
02/18/2009 09:04:36 AM · #2 |
| Great post, Bear. Thanks. I'll keep this one bookmarked. |
|
|
|
02/18/2009 10:10:00 AM · #3 |
|
|
|
02/18/2009 11:35:44 AM · #4 |
A lot of folks at DPC seem to think of and use HDRI as an effects filter. They apply it as a cookie cutter technique to try to get higher challenge scores. Nothing could be further from it's real purpose.
It is refreshing to see Bear_Music explain it in terms of it's primary function.
Properly applied most people would never suspect that HDRI was applied to make a composite image having well rounded tonality and that it was necessary because the camera was incapable of capturing it all in one frame. |
|
|
|
02/18/2009 11:48:28 AM · #5 |
| thank you for that info bear... I feel like I knew all of it theoretically but you put it in a way that made it easy for me to digest |
|
|
|
02/18/2009 12:04:11 PM · #6 |
Originally posted by Artifacts:
A lot of folks at DPC seem to think of and use HDRI as an effects filter. They apply it as a cookie cutter technique to try to get higher challenge scores. Nothing could be further from it's real purpose.
It is refreshing to see Bear_Music explain it in terms of it's primary function.
Properly applied most people would never suspect that HDRI was applied to make a composite image having well rounded tonality and that it was necessary because the camera was incapable of capturing it all in one frame. |
For the record, I have nothing against tone mapping/topaz adjust/lucis arts used as an effects filter for visual drama; I've done it a lot myself and these tools can create striking images. They can also be overused to the point of absurdity, but that's true of any of our digital tools, and absurdity, after all, is in the eyes of the beholder.
What I *DO* have a problem with is calling that sort of work "HDRI", because it isn't. As Steve reiterated, and as I've tried to point out many times, including in this thread, there's a very vital function for HDRI in the total image tool kit. It's analogous to what we do with "Zone System" exposure and development of the negative in traditional, large-format B/W photography, and it's a godsend for serious landscape photographers, among others. HDRI, by the way, is *not* limited to special tools/programs (like Photomatix and Essential HDR) that automate the process. You can exert some exceptional control over your images simply by processing several different exposures each to best advantage for key areas, then overlaying them all in a single composite and erasing selectively the parts of each that you don't want to keep. Doc Sneezy, among others, likes to use this technique sometimes and he does it very well.
There are, however, some built-in advantages to the "tone mapping" step in tools such as Photomatix, where subtle or extreme changes can be made to local area contrast that are very difficult to replicate in a hand-tailored workflow. Indeed, I've started experimenting with doing two or three completely different tone mappings of the same composite HDR image, and then layering *those* and selectively erasing.
Anyway, my point here is that I'm on something of a crusade (always have been) to persuade the anti-HDRI folks that they aren't really objecting to HDRI Itself, but to the heavy-handed application of the HDR toolbox to produce extremely stylized results.
R.
|
|
|
|
02/18/2009 12:05:12 PM · #7 |
Originally posted by AP:
thank you for that info bear... I feel like I knew all of it theoretically but you put it in a way that made it easy for me to digest |
I used to teach Zone System, back in the day, so I've got some experience at trying to frame the process in less-technical terms so people can wrap their minds around it :-)
R.
|
|
|
|
02/18/2009 12:15:17 PM · #8 |
This is awesome, thanks. It'll take some effort to grasp it, definately want to work on this.
|
|
|
|
02/18/2009 01:00:32 PM · #9 |
Yes, Thanks Bear!!
Got me motivated to go give it a go. Used to work the zone system with my 4x5 and spot meter, but the image merging possibility with digital is intriguing.
Sadly, I went to download the Photomatix beta for Aperture, and it doesn't seem to work (the installation instructions don't match anything about the download, and the normal download/install methods don't work, either. I sent them some questions. Anyone here get the Photomatix plugin beta to work in Aperture 2.1? |
|
|
|
02/18/2009 01:12:27 PM · #10 |
Yep, great thoughts Robert!
When doing HDRI exposure series, I use a less rigorous method that nonetheless is very similar in theory to what you are doing. I start with a "correct" single exposure determined using histogram review and the "expose to the right" methodology, then decide on required exposures over and under that by histogram... how much do I need to bring in on both ends?
Your point on taking too wide a range of exposures is an absolutely excellent one. Normal tendency is to think that "if 5 is good, surely 7 will be better.." but it's not necessarily the case. |
|
|
|
02/18/2009 01:57:01 PM · #11 |
|
|
|
02/18/2009 02:45:06 PM · #12 |
Originally posted by kirbic:
Your point on taking too wide a range of exposures is an absolutely excellent one. Normal tendency is to think that "if 5 is good, surely 7 will be better.." but it's not necessarily the case. |
It's not so much how *many* exposures you have as it is the extremes of the range: if the extremes required to "place the brights and the darks accurately are -1 and +1 respectively, then if you are using 1-stop increments that makes 3 exposures. If you increase this to 5 exposures by throwing in a +2 and a -2 then you'll be hurting the image. This is because the software will take the extremes as your desired end-of-range points, meaning that the darkest areas of detail will render on Zone V instead of Zone IV, and the brightest areas of detail will render on Zone VI instead of the desired Zone VII, and everything in between will render on a continuum between Zones V and VI, with the resultant composite image being VERY flat in the information-bearing areas. The software is not "smart", it only knows what you tell it. It assumes that the brightest image in the composite accurately depicts how you want the darkest areas to look, and that the darkest image in the composite accurately depicts how you want the brightest areas to look, and you have to be very careful, in selecting for the composite, merged image, that this is the case.
On the other hand, if you increase your range to 5 exposures by reducing the increments to 1/2 stop (-1, -.5, 0, +.5, +1) then you will often get a better result, at the expense of a longer processing time. In general, you have nothing to fear by using smaller increments within the given range, except in cases where there is movement (ripples on water, windswept foliage, scudding clouds, etc) where *more* exposures = more fuzziness in the affected areas. Some of the time, when I have been forced to use multi-exposure HDRI on a windy scene with clouds sailing by at a rapid clip, I have actually created the normal composite, then taken the best cloud exposure and tone-mapped it separately from the single exposure, then overlaid it on the HDRI composite and erased everything that wasn't working, so that I got crisper clouds within the final, merged image. The same would be true of water surfaces, such as ripples or waves.
It gets complicated.
I know *you* are aware of all this, BTW, it's just an opportunity for me to expand on the topic for others who may not have thought it this far through.
R.
Message edited by author 2009-02-18 14:46:02.
|
|
|
|
02/18/2009 02:49:58 PM · #13 |
Having read this post, I downloaded the trial. Worked OK for me.
Originally posted by chromeydome:
Yes, Thanks Bear!
Got me motivated to go give it a go. Used to work the zone system with my 4x5 and spot meter, but the image merging possibility with digital is intriguing.
Sadly, I went to download the Photomatix beta for Aperture, and it doesn't seem to work (the installation instructions don't match anything about the download, and the normal download/install methods don't work, either. I sent them some questions. Anyone here get the Photomatix plugin beta to work in Aperture 2.1? |
Message edited by author 2009-02-18 15:26:58. |
|
|
|
02/18/2009 02:54:06 PM · #14 |
Originally posted by chromeydome:
Yes, Thanks Bear!!
Got me motivated to go give it a go. Used to work the zone system with my 4x5 and spot meter, but the image merging possibility with digital is intriguing.
Sadly, I went to download the Photomatix beta for Aperture, and it doesn't seem to work (the installation instructions don't match anything about the download, and the normal download/install methods don't work, either. I sent them some questions. Anyone here get the Photomatix plugin beta to work in Aperture 2.1? |
I don't use Photomatix as a plug-in anyway. I wasn't even aware they HAD plugins. I use it as a standalone application: I open the RAW file(s) in Photomatix, do my merge and/or tone mapping, save as 16-bit TIFF, then use photoshop for the rest. This workflow ought to work fine for aperture also?
R.
|
|

|
|
Current Server Time: 04/19/2024 11:25:01 AM  |
Home -
Challenges -
Community -
League -
Photos -
Cameras -
Lenses -
Learn -
Prints! -
Help -
Terms of Use -
Privacy -
Top ^
DPChallenge, and website content and design, Copyright © 2001-2024 Challenging Technologies, LLC.
All digital photo copyrights belong to the photographers and may not be used without permission.
Current Server Time: 04/19/2024 11:25:01 AM EDT.
|


