| Author | Thread |
|
|
10/07/2007 05:33:29 AM · #1 |
Not really a side challenge, but in a way it is. This is an off-shoot of the ideas that are pinging round in the Slice of Life side challenge
Textured layers .....tips, tricks, examples of the layer and the finished work. Sharing of ideas, getting creative in photoshop and having fun. You can post as few or as many as you want.
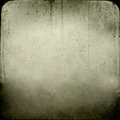
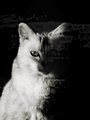
Since I started the thread I guess I'd better kick it off with a pic.
[thumb]596497[/thumb]
If I've got this in the wrong part of the forum feel free to move it SC thanks. |
|
|
|
10/07/2007 07:03:10 AM · #2 |
Totally cool and LOVE what you have done here Sue, and one of these days I hope I get to know how to do this.....
|
|
|
|
10/07/2007 07:50:19 AM · #3 |
Originally posted by sherpet:
Totally cool and LOVE what you have done here Sue, and one of these days I hope I get to know how to do this..... |
Ditto.....
Oh I also need to learn how to add antlers for Christmas gulp
|
|
|
|
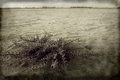
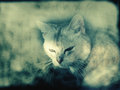
10/07/2007 08:59:37 AM · #4 |
cool thread........
i got this [thumb]596491[/thumb]
using this overlay
 |
|
|
|
10/07/2007 09:23:42 AM · #5 |
Oh yes!! It is quite fun and makes for some moody images. If you find a photo or grunge image that is suitable you can always change the color, or desaturate in Photoshop to make it work for you. The key is making sure the size is similar to your image. If it isn't, do Ctrl T and it will make it available for you to stretch or reduce the size to suit your needs. WOO HOO
Layers rule. |
|
|
|
10/07/2007 09:27:24 AM · #6 |
| Funny, I tried this just the other day. I didn't save my results though. They weren't very good. |
|
|
|
10/07/2007 11:10:52 AM · #7 |
| well I have to try this...of course I am clueless :) |
|
|
|
10/07/2007 11:12:17 AM · #8 |
Originally posted by sittingonthegrass:
well I have to try this...of course I am clueless :) |
I do not even know where to start. I think we need a tutorial :-) |
|
|
|
10/07/2007 11:33:20 AM · #9 |
i think it is explained here........using photoshop
copy/paste over original pic,
edit, freetransform, stretch,
erase @50% + -
flatten
|
|
|
|
10/07/2007 11:44:48 AM · #10 |
| Thanks Leslie, another fun toy to play with. |
|
|
|
10/07/2007 12:08:41 PM · #11 |
|
|
|
10/07/2007 12:26:19 PM · #12 |
Also in the Slice of Life (or Slice of Beige, in my case) side challenge.
Les, dear, how do you erase so that it doesn't leave obvious lines? |
|
|
|
10/07/2007 12:28:17 PM · #13 |
Originally posted by Melethia:
Les, dear, how do you erase so that it doesn't leave obvious lines? |
I am not Leslie, but I selected the texture layer and played with the opacity. I found that 30 - 50% about right for the image I was working with. |
|
|
|
10/07/2007 12:32:59 PM · #14 |
Originally posted by Melethia:
Also in the Slice of Life (or Slice of Beige, in my case) side challenge.
Les, dear, how do you erase so that it doesn't leave obvious lines?
|
umm for me its part of the beauty of it, to leave stuff behind, or why
add the texture? if you dont want lines, just keep erasing..
not sure if i answered correctly. ha
this is very cool, i love it. |
|
|
|
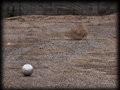
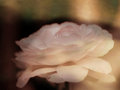
10/07/2007 12:44:07 PM · #15 |
Here is my first experiment. Would be nicer with an interesting subject. How do I make a grungy border?
 |
|
|
|
10/07/2007 01:13:59 PM · #16 |
Great idea, Sue! I've been loving all the overlays, time to try it more myself :-)
 |
|
|
|
10/07/2007 01:28:58 PM · #17 |
Originally posted by BAMartin:
Here is my first experiment. Would be nicer with an interesting subject. How do I make a grungy border?
|
I'm still in the stage of figuring it out, but have been trying adding a duplicate layer, changing the mode to multiply, adding a mask and erasing the centre leaving darker edges. If it's not dark enough I'll play with brightness/contrast.
Another idea I'm trying is to add multiple layers of the texture and changing the mode of them, playing with opacity, masking and erasing bits of them. |
|
|
|
10/07/2007 01:36:33 PM · #18 |
Originally posted by goodman:
Originally posted by Melethia:
Les, dear, how do you erase so that it doesn't leave obvious lines?
|
umm for me its part of the beauty of it, to leave stuff behind, or why
add the texture? if you dont want lines, just keep erasing..
not sure if i answered correctly. ha
this is very cool, i love it. |
No, I meant the lines where I at least can see where I erased and where I didn't. I want to keep most of the texture in some areas and only a little in others - hence I erase those areas, but I can see the demarkation between the erased and not erased areas. (In case you can't tell, I don't usually do any spot editing at all - I really need to work on that!) |
|
|
|
10/07/2007 01:42:50 PM · #19 |
Originally posted by Melethia:
Originally posted by goodman:
Originally posted by Melethia:
Les, dear, how do you erase so that it doesn't leave obvious lines?
|
umm for me its part of the beauty of it, to leave stuff behind, or why
add the texture? if you dont want lines, just keep erasing..
not sure if i answered correctly. ha
this is very cool, i love it. |
No, I meant the lines where I at least can see where I erased and where I didn't. I want to keep most of the texture in some areas and only a little in others - hence I erase those areas, but I can see the demarkation between the erased and not erased areas. (In case you can't tell, I don't usually do any spot editing at all - I really need to work on that!) |
Try lowering the opacity of the texture layer and erasing bit with a soft eraser, if you haven't got enough of the texture left...... add another layer and again play with the opacity/change the mode ...... keep building the layers till you like the effect. That way you should be able to soften the lines |
|
|
|
10/07/2007 01:51:33 PM · #20 |
Here's another texture to try if you want. It's from an old book of my grandmother's
[thumb]596648[/thumb]
and another
[thumb]596653[/thumb]
Message edited by author 2007-10-07 13:57:02. |
|
|
|
10/07/2007 02:12:23 PM · #21 |
| Will come back to this later but here's heaps of free textrures :) |
|
|
|
10/07/2007 02:16:31 PM · #22 |
Originally posted by joynim:
Will come back to this later but here's heaps of free textrures :) |
Great link thanks Charlie! |
|
|
|
10/07/2007 02:20:22 PM · #23 |
[thumb]596638[/thumb]
Combining the method with new stuff... |
|
|
|
10/07/2007 04:22:56 PM · #24 |
Hmmm, I've just spent the last three hours applying textures to every image I could find.... here's one more, I'm stopping now!
 |
|
|
|
10/07/2007 04:27:51 PM · #25 |
I know from when I wanted to learn new things sometimes there was assumed knowledge that I did'nt have and I got stuck.
So here's a tutorial without assumed prior knowledge
Two places that you could start looking for textures are here and in  goodman's portfolio she has stated several times that she is happy for people to use them. When you see a picture of a texture you like right click on it and click on Save Picture As and save into any folder you want. I know have a textures folders that is bursting with goodies :) goodman's portfolio she has stated several times that she is happy for people to use them. When you see a picture of a texture you like right click on it and click on Save Picture As and save into any folder you want. I know have a textures folders that is bursting with goodies :)
Open a photo you want to work on in photoshop and open a textures photo in photoshop so you have 2 photos open at once.
Click on the textures photo because thats the one you will work with first. Press Ctrl A and this will select all of the textures photo.
Then Ctrl C this will copy it.
Now click on the actual photo you wanted to process and then press Ctrl V this will put the texture photo over the photo you want to process. A new layer is made at this point.
Generally the texture photo is not the same size as the photo you want to process so you will need to stretch it. Press Ctrl T and this will put lines around the texture photo. If you left click on the little boxes in the middle of these lines and drag your texture photo will become bigger just drag from each side ( if thats what you want! )untill completely toue texture covers your photo ( if that is what you want! )
Now you need to go over to the layers pallete on the right hand side and adjust the opacitiy. It is quite disconcerting as yu drag the slider along the texture photo seems to go back to its original size but when you let go it goes back to covering your photo again! Adjust the opacity to suit. Dont worry at this point if the texture is covering the main subject of the photo.
Then on the tools pallete on the left hand side click on the eraser tool a box will come up asking you if you want to apply the transform click on yes! I think whatever tool you click on after this will ask to apply transform not sure how to apply it otherwise!
Now along the top you will have some settings to change for the erase tool. I mainly have mine at Brush size 125, Mode Brush, Opacity 75% Flow 50% obviously you will need to experiment to get the best settings for your particular photo.
Now left click on the photo on your main subject and hold the click down move the mouse carefully around and you will begin to erase the texture from the main subject , erase to your taste.
At this point I also add actions and any other editing you may want to do , resize and then post in this thread so we all can see and learn :)
I want to thank [user]Sandy P[/user] who taught me some of this information a few days ago ;) and [user]Goodamn[/user] who posted how to add the texture. This is just the way I do it. There may be better and easier ways I would love to hear them! But I really hope this gives at least one person the confidence to give it a go and discover they can do it just like I did just a few days ago Wooo Hooo
If I havent made anything clear or if you have any questions please feel free to PM me ;)
Here are some photos I have done
Edit to add this is just a basic way I am still waiting to learn the more advanced ways of doing it ;)
Message edited by author 2007-10-08 04:35:16. |
|
Home -
Challenges -
Community -
League -
Photos -
Cameras -
Lenses -
Learn -
Prints! -
Help -
Terms of Use -
Privacy -
Top ^
DPChallenge, and website content and design, Copyright © 2001-2024 Challenging Technologies, LLC.
All digital photo copyrights belong to the photographers and may not be used without permission.
Current Server Time: 04/18/2024 04:18:27 PM EDT.


