| Author | Thread |
|
|
04/06/2006 12:26:50 PM · #76 |
Originally posted by jhonan:
Ahhhh.... Finally I understand. I just tried it out. In manual mode the Ev setting doesn't do anything!
In AP mode it adjusts shutter speed, in SP mode it adjusts aperture.
I think I'll stick with manual mode... |
Right, in manual mode "exposure compensation" doesn't do a thing. In manual mode you have the little bar in the bottom of your viewfinder and that's exactly analogous; if you center the pointer, that's "neutral"; move the pointer giht for more exposure, left for less exposure. The bars represent the same increments.
Personally, I just prefer to stay in the habit of THINKING as I shoot, and manual exposure makes me do that. I find that when I set the auto modes I tend to turn my brain off, figure the camera will be "close enough" and PS can handle the rest, and that's really not a good way to work...
But if you're a shooter who grew up on full auto, it's a real effort to learn to handle it manually, if you're not careful and conscientous you end up, inevitably, with a certain number of useless pcitures. Why? Because you left the camera on manual mode when you stopped shooting yesterday, and you just grabbed it today and forgot it was on manual, expected the camera to do all the work, and the settings were completely wrong...
So you have to pay attention... And that's a Good Thing, IMO.
Robt.
Message edited by author 2006-04-06 12:27:19.
|
|
|
|
04/06/2006 12:30:08 PM · #77 |
Originally posted by Cyndane:
I'm one of those people who learns better by trying and seeing... so I did this:

I skipped an image or two that didn't have super-strong differences. Each flower is an adjustment (or 2) on the EV setting bar.
Kinda helped me. :) |
That's a good little exercise/illustration, thanks.
Now do this: take the darkest one and the lightest one and see how close you can get them to match the "neutral" one in PS; to see what you have to deal with if you miss the target exposure. In this particular string the differences may not matter, but try the same exercise on a truly contrasty scene and watch what happens :-)
R.
|
|
|
|
04/06/2006 02:36:01 PM · #78 |
I took three photos I shot last night.. the first was slightly underexposed, the second was pretty much properly exposed, and the last one was a little overexposed.

The first one gave me plenty of trouble in PS, trying to get it to look right. It was just too dark. The sky still looks too gray, almost stormy. The sky in the back looks too pink to me... and the water looks kind of gray too.
The last one looks a little better, but in PS, I had to play with the colors a lot to get it to look somewhat natural. I think the sky still looks too blue, there's not quite enough definition in the clouds, and the water has a bit of a tint to it that I don't like.
The middle one came out just the way I wanted it to - the way I was seeing it when I was there. The sunlight on the water looks nice, and the colors are pretty close to accurate.
It's pretty amazing to think about it the way we're talking about it here.. just a little adjustment can save the photo and save lots of PP time. Never thought about it that way... whenever I'm out taking shots, I always tell myself, 'Ah well... I can fix that later if it doesn't work properly.
:) |
|
|
|
04/06/2006 09:48:05 PM · #79 |
Originally posted by error99:
Interesting. *snipped images*
|
When you took the black and white images, were you inside or outside? |
|
|
|
04/06/2006 10:24:25 PM · #80 |
all three images were taken outside in direct sunlight.
|
|
|
|
04/06/2006 10:25:13 PM · #81 |
Okay, here are my 3 shots for Lesson 2.
I had put camera on what I thought was auto, don't ever use them, so I put it on something else and my original images weren't coming out even close.
Because of the lighting that I took in - the white is off, but here they are... I was amazed. Even though you told us what to expect Robert, seeing really is believing.
Left to right: white, black and then both.
[thumb]317738[/thumb] [thumb]317737[/thumb] [thumb]317735[/thumb] |
|
|
|
04/06/2006 10:27:27 PM · #82 |
Originally posted by error99:
all three images were taken outside in direct sunlight. |
Thanks, I may try that way tomorrow, see what differences are as compared to the horrible lighting in my utility room. :D
Cyndane: I like your idea with the flowers, may try that too, just to see and keep track of the settings.
|
|
|
|
04/06/2006 10:34:38 PM · #83 |
Originally posted by Skyarcher:
Okay, here are my 3 shots for Lesson 2.
I had put camera on what I thought was auto, don't ever use them, so I put it on something else and my original images weren't coming out even close.
Because of the lighting that I took in - the white is off, but here they are... I was amazed. Even though you told us what to expect Robert, seeing really is believing.
Left to right: white, black and then both.
[thumb]317738[/thumb] [thumb]317737[/thumb] [thumb]317735[/thumb] |
Are you using auto white balance? If so, try setting wb to tungsten, or whatever light source you are using. If shooting RAW you can change it at conversion. |
|
|
|
04/07/2006 12:53:16 AM · #84 |
Uhmm... I'll have to double check, don't think it was awb though.
Shot jpg's for these and only resized, did no other changes to them. |
|
|
|
04/07/2006 01:36:51 AM · #85 |
Originally posted by Skyarcher:
Uhmm... I'll have to double check, don't think it was awb though.
Shot jpg's for these and only resized, did no other changes to them. |
White balance isn't important for the exercise. Don't worry about it. Real eye-opener, isn't it?
Now, if you want, do the exercise again, with +2, -2 and 0 exposure compensation dialed in :-)
Robt.
Message edited by author 2006-04-07 01:39:36.
|
|
|
|
04/07/2006 01:38:52 AM · #86 |
...
Message edited by author 2006-04-07 01:39:21.
|
|
|
|
04/07/2006 05:08:56 AM · #87 |
So Robert, when you work out the exposure for a landscape scene do you usually work in manual mode, adding or cutting stops from an average reading until everything looks right? Or do you spot-meter on the brightest highlights in which you want detail and then add 3 stops to render those values as zone 8?
The reason I ask is I've been shooting 35mm B&W negatives recently. When a shot is really important to me and I have time, I try to place the darkest shadows of my scene in which I want detail around zone 2 (by cutting the exposure 3 stops from a spot-meter of the shadows). Is this good exposure practice?
|
|
|
|
04/07/2006 11:29:42 AM · #88 |
Originally posted by justin_hewlett:
So Robert, when you work out the exposure for a landscape scene do you usually work in manual mode, adding or cutting stops from an average reading until everything looks right? Or do you spot-meter on the brightest highlights in which you want detail and then add 3 stops to render those values as zone 8?
The reason I ask is I've been shooting 35mm B&W negatives recently. When a shot is really important to me and I have time, I try to place the darkest shadows of my scene in which I want detail around zone 2 (by cutting the exposure 3 stops from a spot-meter of the shadows). Is this good exposure practice? |
In B/W film, the darkest zone with useable detail is zone 3; zone 2 will go pure black. So for film, meter the shadow areas where you want "dark detail" and give 2 stops less exposure. That's your base exposure. Then meter the areas you want to have "bright detail" and compare the metered EV; you want these areas on zone 7.
If the dark areas meter to, say, an EV of 11, and the bright areas to EV 15, the scene has nominal contrast and can be processed normally. If the bright areas came to EV 17, then you'd have to "pull" the film from processing early to avoid blocking the highlights. If the brights were EV 13, you'd have to "push" the film to gain contrast by increasing the processing time.
For all practical purposes, with roll film, plus 2 to minus 2 is your useable range of push/pull processing. It's impossible for me to say what the actual increase/decrease in processing time would be; it's different for every film/developer combination, and with zone system we extablish the parameters by running tests on that film/developer combo.
If you need more information, ask, but this isn't a zone system thread.
As for digital landscape shooting, I usually work in manual mode yes. If I HAD a spot meter I'd use it, but I don't. However, Ihave a lot of experience at this, so I am pretty well able to judge how much to adjust the exposure just by looking at the scene. You have the process right, except that I place my "detailed brights" on zone 7, not zone 8. Push/pull "processing" is accomplished with contrast masking in photoshop, usually.
Robt.
|
|
|
|
04/07/2006 11:34:04 AM · #89 |
Originally posted by Bear_Music:
Push/pull "processing" is accomplished with contrast masking in photoshop, usually.
Robt. |
I'm pretty sure you've posted a step-by-step for this technique before -- this might be a good place to insert a link to it, since it seems to be a common part of the standard workflow. I, for one, can't remember how to do it. |
|
|
|
04/07/2006 11:46:24 AM · #90 |
Originally posted by GeneralE:
Originally posted by Bear_Music:
Push/pull "processing" is accomplished with contrast masking in photoshop, usually.
Robt. |
I'm pretty sure you've posted a step-by-step for this technique before -- this might be a good place to insert a link to it, since it seems to be a common part of the standard workflow. I, for one, can't remember how to do it. |
Oy, vey....
Contrast Masking
In PS CS2: use the shadow/highlight dialogue box and play with it. Can't help you there, don't have it.
In PS 7.0 (and maybe CS, if no shadow/highlight there) do this:
1. Open image and save-as a psd file.
2. Key "cntrl-alt-tilde" (tilde is ~) to create a feathered highlights selection
3. Key "cntrl-J" to create a new layer with only the selected areas on it. Name this layer "highlights"
4. Click BG layer to make it active again
5. "cntrl-alt-tilde" again, then "cntrl-shift-I" to invert the selection, and "cntrl-J" to make another new layer with the shadow selection loaded; call this layer "shadows".
To decrease contrast to preserve highlight detail and shadow detail both, in the layers dialogue box set the layer mode of the "highlight" layer at "multiply" and of the "shadow" layer at "screen". Adjust the relative opacities of both layers so it looks the way you want it to.
To increase contrast, screen the highlights and multiply the shadows; this isn't something I do very much, this can be best accomplished in levels and curves usually. However, sometimes I multiply BOTH layers and vary the relative opacities. I'm still playing with this. Also, sometimes I will set the shadow mask at "soft light" instead of "multiply". You need to play around with these settings to find what works and what does not work.
Robt.
Message edited by author 2006-04-09 23:19:34.
|
|
|
|
04/07/2006 11:50:08 AM · #91 |
|
|
|
04/07/2006 12:27:31 PM · #92 |
Hi. Forgive me if this is off base, but I have found that sometimes the camera makes better auto metering decisions when I switch the white balance. This primarily affects colored scenes. I am going to guess that if the camera tries to correct a white balance by pushing certain colors down, if improperly set, it can have rather strong affects on complementary or contrasting colors. By means of an example for what I'm thinking of, if the camera is trying to correct a heavy yellow cast which isn't actually there, it might decrease the yellow in objects that are naturally yellow, and change their relationship to 18% grey or whatever...
This is just a guess, but from what I've seen in using P&S cameras, setting the wrong WB can often drastically affect the exposure. I've seen changes of a stop or more.
I am going to guess that this is a byproduct of the micro-filters on each sensor to filter color information to get a luminance reading in a specific channel.
Am I wrong here?
Anyways, regardless, I think the point is that WB may have a confusing effect on your camera's automatic metering which further supports the need to learn how to do this by yourself. If you get your exposure right, the WB will not affect this, regardless of how you work the WB in RAW conversion afterwards.
This is a fantastic thread. |
|
|
|
04/07/2006 12:31:52 PM · #93 |
Originally posted by eschelar:
This is a fantastic thread. |
Thanks. We're drifting WAY off course though :-) Not your fault, I'm doing it too. I don't have an answer to your WB question, I never thought about it. Kirbic might know. Why not start a thread with that topic; "How Does White Balance Affect Exposure?"
Robt.
|
|
|
|
04/07/2006 12:44:12 PM · #94 |
Originally posted by Bear_Music:
Originally posted by eschelar:
This is a fantastic thread. |
We're drifting WAY off course though :-) |
Sorry, I'll quit with the zone system/exposure questions ;)
Message edited by author 2006-04-07 16:59:56.
|
|
|
|
04/07/2006 12:46:48 PM · #95 |
Originally posted by justin_hewlett:
Sorry, I'll quit with the zone system/exposure questions ;) |
I think for the moment we've gone far enough with that. Next step is to cook up another shooting lesson.
Robt.
|
|
|
|
04/07/2006 12:58:14 PM · #96 |
Originally posted by Bear_Music:
Next step is to cook up another shooting lesson.
|
Yes, please!
(Very interesting info on the zone system, too)
Liza
Message edited by author 2006-04-07 13:06:13. |
|
|
|
04/07/2006 01:08:44 PM · #97 |
The following lesson is identical to an earlier lesson in the landscape/natural light thread of last year. It's a useful lesson because it explores how landscape photography doesn't necessarily follow the same rules as, say, portrait photography. We will follow up on this lesson by beginning a discussion and exercises on various "rules of composition" as they apply to landscape photography.
***************
Now that we’ve discussed the “types” of natural light we work with, and taken a foray into the fundamentals of correct exposure, let’s do an actual landscape-shooting assignment.
Lesson 3 — Landscape Without Subject
It's a common "rule" that a landscape or seascape "needs" a "subject" in order to be effective. Shooters are told to include a "foreground object" for scale and visual interest, or at the least be sure there is some dominant feature in the landscape that draws our eye and keeps us engaged. While this is generally good advice, it's not an absolute requirement. Sometimes the inclusion of common compositional aids draws our attention away from the simpler, more engaging aspects of the light or the scene. It's perfectly possible to take wonderful landscapes with NO definable subject; or, rather, where the entire image IS the subject.
Let me reiterate that: sometimes the landscape, in its entirety, is your “subject” and no single portion of the image will dominate at the expense of subordinating other elements. Indeed, sometimes allowing a dominant element into the image will run completely against your desired effect.
This approach can be particularly effective when texture, or subtle color, or interplay of light/surface is compelling our attention. The following images tend to be "subjectless" in that sense, concentrating on light and/or texture at the expense of conventional compositional devices:
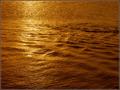 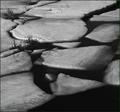 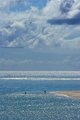 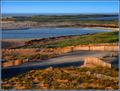 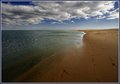
That's not to say these images have NO subject; for example, in the third one the fishermen might be seen by some as the "subject", and in the fourth one the fences might be considered the "subject", but in both cases the dominant feature of the image is the light, and the landscape is the canvas on which the light is working.
Have at it folks; let's see some "broad canvas" landscapes without subjects. I encourage you to "shoot for" this assignment, but it's OK to post examples from your archives as well.
Robt.
Message edited by author 2006-04-07 13:09:20.
|
|
|
|
04/07/2006 01:16:37 PM · #98 |
Originally posted by Bear_Music:
snipRobt.>snip |
Thanks for the thread, Robert. I'm glad you mentioned "exposing to the right" as I only recently read about this after so often hearing under-exposed is better than over-exposed with digital (at least when shooting in RAW). Here's a link for those interested, so this thread doesn't go off-topic. :-)
|
|
|
|
04/07/2006 01:33:26 PM · #99 |
Robert,
Hope its ok if I slip into class :) I"m watching and i'll participate as able.
mark |
|
|
|
04/07/2006 02:19:53 PM · #100 |
Originally posted by mpeters:
Robert,
Hope its ok if I slip into class :) I"m watching and i'll participate as able.
mark |
The more the merrier.
R.
|
|


