| Author | Thread |
|
|
04/21/2021 09:02:15 AM · #1 |
I am starting this thread as a place for people to post their originals (other than submitting these as proof for validating ribbon results) so others can see what can be done to improve a certain image or how to achieve certain results. I hope others will follow the example.
To start, here is the original to my ribbon winner of the Blue Filter challenge.

and here is the entry
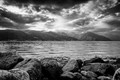
The post-processing is described in the comments to the entry.
Initially I was disappointed with the image because the landscape on the other side of the fjord did not show much detail or depth as result of the overall contrast. In my memory the landscape was much more spectacular. The post processing however did bring out quite a lot of detail and depth (by increasing contrast in a limited tonal range) and I really like the B&W result. |
|
|
|
04/21/2021 09:04:34 AM · #2 |
| great idea for a thread Willem .. :) |
|
|
|
04/21/2021 09:41:44 AM · #3 |
Great idea and wonderful edit.
|
|
|
|
04/21/2021 10:31:40 AM · #4 |
| Usually a blue filter makes the sky light, and in your landscape is is much darker than original. I understand that in addition to applying the filter we are allowed to use other tools at our disposal- contrast, burning, etc., and that's what you probably did there, but by doing this you somewhat negated the "blue filter look". Gorgeous looking landscape though. |
|
|
|
04/21/2021 10:39:38 AM · #5 |
This could be a very, verrrryyy, interesting thread. :-)
 |
|
|
|
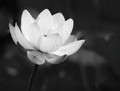
04/21/2021 11:25:40 AM · #6 |
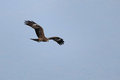
Didn't set the world on fire, but I really liked how the blue filter made the lotus glow. Didn't use diffuse glow, either.
I tried the filter on some purple tulips but they came out black. Didn't appeal to me.
Original:
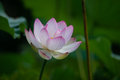
Entry:
 |
|
|
|
04/21/2021 11:57:12 AM · #7 |
I crop it on the side and apply blue filter - I don't know if I did correct the blue filter but i like the results.
I know that my crop was not perfect, I left a piece of leaf on the right .
original :

Entry :

Message edited by author 2021-04-21 12:05:24. |
|
|
|
04/21/2021 02:13:20 PM · #8 |
Entry: 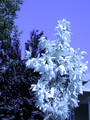 Original: Original: 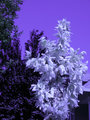
Shot about six years ago through a (physical) blue filter.
Simple RGB Curve to lighten highlights. Selective Color to reduce magenta and increase cyan to make the sky less purple. |
|
|
|
04/21/2021 03:21:13 PM · #9 |
Originally posted by mshonak:
I crop it on the side and apply blue filter - I don't know if I did correct the blue filter but i like the results.
I know that my crop was not perfect, I left a piece of leaf on the right .
original :
Entry :
|
I like the colors on both, but prefer the one with blue filter because also the background is colored. |
|
|
|
04/21/2021 03:30:41 PM · #10 |
Originally posted by LevT:
Usually a blue filter makes the sky light, and in your landscape is is much darker than original. I understand that in addition to applying the filter we are allowed to use other tools at our disposal- contrast, burning, etc., and that's what you probably did there, but by doing this you somewhat negated the "blue filter look". Gorgeous looking landscape though. |
The effect of the blue filter is subtle but really noticeable on the hills. All dark tones are lightened (contrast is reduced, as expected for a blue filter) and more detail becomes visible. |
|
|
|
04/22/2021 10:02:27 PM · #11 |
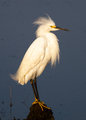

I was surprised how black it made the yellow on the face -- and yet it didn't do much at all to the yellow feet...
Ok -- now that I look at it, I went back into Silver Efex, and the full dynamic setting left the feet grey while other settings made them completely black when using the blue filter. No wonder they were different.
I need to remember the blue filter, though. I'm the photographer at an aquarium. When I tried one of the aquarium shots with a blue filter in SEP, and the changed the luminosity, it lightened the water an interesting amount. |
|
|
|
04/22/2021 10:33:22 PM · #12 |
Some basic edit LR
Blue Filter in SilverEfex BW conversion in PS layer on Luminosity
Entry SilverEfex layer Normal

Message edited by author 2021-04-22 22:34:23. |
|
|
|
04/23/2021 04:27:20 AM · #13 |
| Thanks for posting. Really interesting to see. Must remember when converting to B&W how filters can be used to make certain colours stand out (or not). |
|
|
|
05/12/2021 05:04:30 AM · #14 |
Original

Post processing:
* exposure and white balance adjustment
* cloning out some blown out highlights and visible parts of the flash unit
* cloning out some red spots due to flash-ready led
* crop, resize, sharpen, save for web
Result
Message edited by author 2021-05-12 05:08:00. |
|
|
|
06/04/2021 04:44:08 AM · #15 |

Processing:
* copy arm from first image three times and remove from original by copying white door and wall across it.
* first copy leave in position, just change opacity
* second copy move halfway towards the door, change opacity
* third copy smudge towards the door, change opacity
* copy arm from second picture
* copy body from first image into separate layer, change opacity, move a few pixels to create sense of movement
* copy image with hole in door, invert, resize and move into position
* remove lines under the hand, add some additional lines and roughen the edges
* apply levels, convert to B&W, add vignette, crop and resize, save for web |
|
|
|
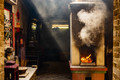
09/02/2021 02:58:35 PM · #16 |

I was asked how I got the look of my museum entry ... apparently most of the credit belongs to the museum�s lighting designer.
My camera is bad in low-light situations -- really bad noise even at a modest ISO 400 -- and doesn�t open that wide. I was pretty lucky to get reasonable focus with relatively long hand-held exposures.
I made three exposures, stitched them with the free demo version of AutoStitch, applied noise-reduction to the composite with PictureCooler (both Windows programs).
I then moved to Photoshop* on a Mac**. I thought about using the Channel Mixer to convert to grayscale and then tinting (see below), but I ended up simply applying a rather extreme Curve adjustment to the RGB channel; the separate color channels remained in their default positions. The arrows in the screen-shot indicate the approximate location of the color values shown in the info box. The focal length value displayed in the EXIF data gets multiplied by six, so this was the equivalent to a 36mm lens on a full-frame camera.
After cropping and re-sizing I sharpened using two techniques: Unsharp Mask using a low amount and a high radius with a threshold of zero, and then applying the HighPass filter to a copy of that layer and applying it in Overlay mode. Added the border (mixed reviews on that) and saved as JPEG.
I�ve posted the leftmost original in case anyone wants to play with editing to try and match (or improve!) my results.
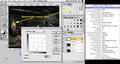 
*Version 5.0 (1998) **G3 desktop (1995)
======================
Here are some alternate edits I use to get a �vintage� or sepia look:
Composite RGB mode change to Grayscale: 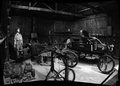
Channel Mixer in Monochrome mode, without individual channel adjustments, with overlying Curves adjustment to apply a slight yellow (negative-blue) tint: 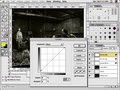 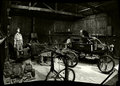
Composite RGB mode change to Grayscale, then mode change to Duotone*** using Black and Pantone 147 as �inks�; displayed curve/table show values for the Pantone color: 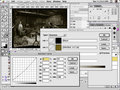 
***Images edited in Photoshop's Duotone mode must first be converted to RGB mode before saving as JPEG or TIFF.
Message edited by author 2021-09-02 15:00:41. |
|
|
|
09/02/2021 03:31:21 PM · #17 |
Cool! I'd forgotten about this thread. Thanks there  GeneralE. GeneralE. |
|
|
|
09/02/2021 04:01:13 PM · #18 |
Originally posted by vawendy:
I was surprised how black it made the yellow on the face -- and yet it didn't do much at all to the yellow feet...
Ok -- now that I look at it, I went back into Silver Efex, and the full dynamic setting left the feet grey while other settings made them completely black when using the blue filter. No wonder they were different.
I need to remember the blue filter, though. I'm the photographer at an aquarium. When I tried one of the aquarium shots with a blue filter in SEP, and the changed the luminosity, it lightened the water an interesting amount. |
I can't begin to tell you how much better I like the oribinal image! LOL!
|
|
|
|
09/02/2021 04:26:18 PM · #19 |
| Thanks for the in-depth explanation Paul. Much appreciated :) |
|
|
|
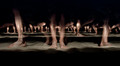
09/06/2021 03:42:45 AM · #20 |
Original

Alternative processing

Entry
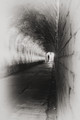
This was a tunnel in a fortification built around a small town in the time of Napoleon (1811) It has holes on the right for shooting at the enemy. This creates the nice effect on the left wall.
Message edited by author 2021-09-06 05:12:51. |
|
|
|
09/06/2021 01:51:16 PM · #21 |
RAW with no adjustments:

Initial conversion done in Luminar 4, output to JPG:
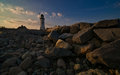
Final entry:
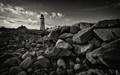
One thing I often do with textures (such as the rocks in this pic)is to duplicate the layer and apply some tonemapping or other adjustment to the lower layer, then selectively mask through in some places to make some of the surface details stand out a little more. I think this helps to give some dimension to the scene without a large amount of over the top tonemapping to the entire scene. |
|
|
|
09/07/2021 03:08:30 AM · #22 |
Originally posted by Yo_Spiff:
One thing I often do with textures (such as the rocks in this pic)is to duplicate the layer and apply some tonemapping or other adjustment to the lower layer, then selectively mask through in some places to make some of the surface details stand out a little more. I think this helps to give some dimension to the scene without a large amount of over the top tonemapping to the entire scene. |
That worked really well on those rocks. Enhances the depth. |
|
|
|
09/07/2021 08:04:17 AM · #23 |
It's amazing how much detail you managed to bring out of that rather dull RAW.
|
|
|
|
09/08/2021 07:27:16 AM · #24 |
|
|
|
09/08/2021 01:42:33 PM · #25 |
Originally posted by Tiberius:
|
I like the processing you did on all 4 of them |
|
Home -
Challenges -
Community -
League -
Photos -
Cameras -
Lenses -
Learn -
Prints! -
Help -
Terms of Use -
Privacy -
Top ^
DPChallenge, and website content and design, Copyright © 2001-2024 Challenging Technologies, LLC.
All digital photo copyrights belong to the photographers and may not be used without permission.
Current Server Time: 04/16/2024 03:31:05 PM EDT.