| Author | Thread |
|
|
05/02/2012 02:24:30 PM · #1 |
Though I'm pretty happy with how my entry for the Dallas challenge turned out- 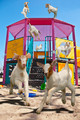 - I wish I had better PS skills or at least more PS knowledge so I could have done things like made scuffs of sand up in front of the hooves of the two kids in the foreground. I did my best to shoot both the kids and the playground at approximately the same time of day and from the same POV. I figured out Select and Refine Edges, so yay me :-) but stuff like making shadows and making them look realistic with Transform took some time. Then it was just a matter of using Place to insert the individual kids in the shot and size them according to position, angle, perspective etc. - I wish I had better PS skills or at least more PS knowledge so I could have done things like made scuffs of sand up in front of the hooves of the two kids in the foreground. I did my best to shoot both the kids and the playground at approximately the same time of day and from the same POV. I figured out Select and Refine Edges, so yay me :-) but stuff like making shadows and making them look realistic with Transform took some time. Then it was just a matter of using Place to insert the individual kids in the shot and size them according to position, angle, perspective etc.
So what would you PS wizards have done either in addition to the existing pic? Or, using this same idea, what might you have tried differently to improve upon it? |
|
|
|
05/02/2012 02:27:18 PM · #2 |
| first i'd soften the edges so the goats dont look like cutouts. |
|
|
|
05/02/2012 02:33:21 PM · #3 |
did way better than my attempt thought it was perfect for 5 year old 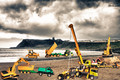 |
|
|
|
05/02/2012 02:35:18 PM · #4 |
Originally posted by mike_311:
first i'd soften the edges so the goats dont look like cutouts. |
You dissing on Colorforms!
 |
|
|
|
05/02/2012 02:39:25 PM · #5 |
Originally posted by klkitchens:
[quote=mike_311] first i'd soften the edges so the goats dont look like cutouts. |
You dissing on Colorforms!
wow, that's funny i actually did reference them at first but changed my thought as i didn't think some would get the reference. |
|
|
|
05/02/2012 02:40:14 PM · #6 |
Originally posted by mike_311:
Originally posted by klkitchens:
[quote=mike_311] first i'd soften the edges so the goats dont look like cutouts. |
You dissing on Colorforms!
wow, that's funny i actually did reference them at first but changed my thought as i didn't think some would get the reference. |
LOL! |
|
|
|
05/02/2012 02:41:40 PM · #7 |
Originally posted by mike_311:
first i'd soften the edges so the goats dont look like cutouts. |
Agreed...I did realize that I was using too hard an edge to cut them out of their original scene, but on the last day/evening, was getting frustrated with the shadows and didn't know if I could go back and fix up the edges or not. Ah well... |
|
|
|
05/02/2012 02:42:42 PM · #8 |
Mike is right, that is the first necessary step for a good montage.
But the main problem with this kind of images is the light. Now I'm on my iphone but I've seen your image during voting so I hope I remember it well. The background image is in the shade but the goats have a different light. There's no good montage without an accurate study of the direction of lights. IMO is one of the most important things. Gyaban says it all the time too :) |
|
|
|
05/02/2012 02:42:45 PM · #9 |
given the competition i think the original entry with the cutouts is perfect as is.
for a more serious entry, based on what i learned in my post-entry-still-trying-to-process learning, i think that each goat should have it's own layer and you work on matching the goat per it's layer/placement, then when you have finished each goat do any general touch-ups that would be required.
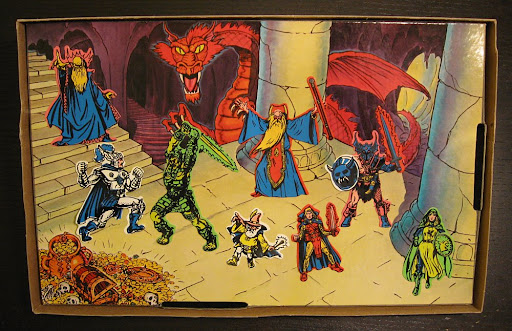
That's what i did when i tried to have the dragons in my image shooting fire. at first it was really cheesy, then i followed the above steps and it looked 'better' (that being a relative term). I don't know if that helps, but i hope it does.
Message edited by author 2012-05-02 14:44:13. |
|
|
|
05/02/2012 02:43:59 PM · #10 |
Originally posted by snaffles:
Originally posted by mike_311:
first i'd soften the edges so the goats dont look like cutouts. |
Agreed...I did realize that I was using too hard an edge to cut them out of their original scene, but on the last day/evening, was getting frustrated with the shadows and didn't know if I could go back and fix up the edges or not. Ah well... |
just paint around the edges with the blur tool.
it goes a lomg way to making it look not so fake. |
|
|
|
05/02/2012 02:53:41 PM · #11 |
Originally posted by RyanWareham:
given the competition i think the original entry with the cutouts is perfect as is.
for a more serious entry, based on what i learned in my post-entry-still-trying-to-process learning, i think that each goat should have it's own layer and you work on matching the goat per it's layer/placement, then when you have finished each goat do any general touch-ups that would be required.
That's what i did when i tried to have the dragons in my image shooting fire. at first it was really cheesy, then i followed the above steps and it looked 'better' (that being a relative term). I don't know if that helps, but i hope it does. |
Thanks for the nice words! I did have each goat on its own layer and tried to dodge and burn it according to the fall of light. The two main goats had theri own shadow layers. It was once I manipulated them that I finally hit save and Placed them. |
|
|
|
05/02/2012 02:54:15 PM · #12 |
Originally posted by mike_311:
Originally posted by snaffles:
Originally posted by mike_311:
first i'd soften the edges so the goats dont look like cutouts. |
Agreed...I did realize that I was using too hard an edge to cut them out of their original scene, but on the last day/evening, was getting frustrated with the shadows and didn't know if I could go back and fix up the edges or not. Ah well... |
just paint around the edges with the blur tool.
it goes a lomg way to making it look not so fake. |
The perfect way to get it is to use the pen tool, but it's not easy at the beginning. When I I have a hard task I use the pen tool and graphic tablet, but the tablet is very useful for small areas otherwise pen tool can work alone, but you need a lot of practice. For my Dallas entry I used both, but when you know how to do it doesn't take too much time... the creation of 'believable' shadows is quite harder. |
|
|
|
05/02/2012 02:56:11 PM · #13 |
Originally posted by snaffles:
Originally posted by mike_311:
first i'd soften the edges so the goats dont look like cutouts. |
Agreed...I did realize that I was using too hard an edge to cut them out of their original scene, but on the last day/evening, was getting frustrated with the shadows and didn't know if I could go back and fix up the edges or not. Ah well... |
Here's Kevin's helpful tip...
Don't cut them out -- or cut them out with a BIG border around them ("Lazy Cut" my quilting wife might call it).
So...
Draw a big border around the figure in the original photo.
SHIFT-CTRL-J in photoshop to raise the selection to a new layer.
Drag the new layer onto the background scene.
Adjust opacity to about 80% so you can place it where you want it.
Restore opacity to 100%
Add a Layer mask to the layer.
Using a soft edge brush at about 34% opacity and your color set to black, start lightly painting the edges of the new layer to hide the unwanted parts.
If you mess up, change the color to white and paint back in the areas you want to show.
Black conceals, White Reveals.
|
|
|
|
05/02/2012 03:27:42 PM · #14 |
My sensitivity to the context precludes me from giving in to my compulsion. ...publicly, anyway.
Overall, you got a kickass score for the end product. Lots of on-the-money tips already posted. |
|
|
|
05/02/2012 03:53:57 PM · #15 |
@ Kevin...I'll give your hints a try but I didn't cut and paste, I used Select and Refine Edge to remove the goats...what tool(s) would I be using to draw a border around them from the original pic?
ETA:@ Ken....uhm what on earth did you do to my lovely entry?! Did you put in Godzilla making bbq goat or something?
Message edited by author 2012-05-02 15:55:45. |
|
|
|
05/02/2012 04:08:31 PM · #16 |
Originally posted by snaffles:
@ Kevin...I'll give your hints a try but I didn't cut and paste, I used Select and Refine Edge to remove the goats...what tool(s) would I be using to draw a border around them from the original pic? |
I think what he is saying is to use the lasso tool to cut a liberal area around the goat and when you place/paste it in, use a layer mask and "brush" away the parts you want to remove. I would set the brush's hardness to 90-95%.
Originally posted by snaffles:
ETA:@ Ken....uhm what on earth did you do to my lovely entry?! Did you put in Godzilla making bbq goat or something? |
You don't want to know. ...otherwise you'd PM me and ask to see it. ;-) |
|
|
|
05/02/2012 04:27:10 PM · #17 |
Originally posted by snaffles:
@ Kevin...I'll give your hints a try but I didn't cut and paste, I used Select and Refine Edge to remove the goats...what tool(s) would I be using to draw a border around them from the original pic?
ETA:@ Ken....uhm what on earth did you do to my lovely entry?! Did you put in Godzilla making bbq goat or something? |
The way you did it in fine, maybe feather the edge more next time. |
|
|
|
05/02/2012 06:55:37 PM · #18 |
| Ok so now I have some ideas as to how to clean up the goats. But how to do sand being scuffed up by their hooves? |
|
|
|
05/02/2012 07:29:10 PM · #19 |
Originally posted by snaffles:
Ok so now I have some ideas as to how to clean up the goats. But how to do sand being scuffed up by their hooves? |
Try this:
-grab a selection of sand
-paste onto new layer
-use the skew or distort transformation to stretch it in the desired direction
-apply motion blur (perhaps through a graduated mask) in the desired direction
-erase away or mask-off undesired parts to make the shape of the splash you want
ETA: or find/take a picture like this and copy the relevant section ... ;-)
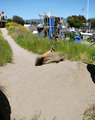 ... you are welcome to borrow a piece of this picture if that will help ... ... you are welcome to borrow a piece of this picture if that will help ...
Message edited by author 2012-05-02 19:33:15. |
|
|
|
05/02/2012 09:05:53 PM · #20 |
Hmm, have a basic idea of what you mean, Paul, but not 100% sure I understand all thar fancy PS speak...grab a selection of sand but with which tool? Use the marquee? Magic lasso? Something else? Paste and Transform I get, but how to do a graduated mask?
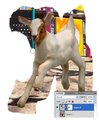
For example how would I get the kind of spray that is basically like a rooster tail, from say a horse doing a sliding stop...I might have one kicking around...like this...
Now obviously not quite so much sand, but this basic effect...I was thinking of cloning and using an airbrush effect. Any other ideas?
Message edited by author 2012-05-02 21:09:37. |
|
|
|
05/03/2012 02:06:47 AM · #21 |
Any selection/marquee tool will do -- you are just duplicating a chunk of the picture onto a new layer ... the particular shape would be determined later. You make the mask by making a new Channel (not *layer*) and filling it with the Blend tool from black to transparent.
Tomorrow, if it's OK, I'll try to grab your photo and create an example with some screen-shots to show what I mean ... realize I'm speaking from theory -- I've not tried this particular effect before ... :-) |
|
|
|
05/03/2012 06:18:02 AM · #22 |
Sorry for the late reply, I didn't have a chance to write that sooner. Overall I think you did a good job! Of course, things can always be improved, and here are some hints I can provide (sorry about the English mistakes!).
1) Light direction
You really need to define, very clearly, where is located your main light source. You can have several other "minor" sources, depending on the scene, but you do need a main one that must be very obvious to the viewer. Once you decided that, ALL your photos must comply with the decision. There is no need (at all) in spending time masking things carefully, softening edges, adding sand, or covering them with whatever special effect if the lighting is not consistent: it just won't look right, whatever you do. Let's talk about your photo. When you look at the playground itself, you can see that the sun light it from the upper right (the right yellow panel is brighter than the left one), from behind it (the upper part of the stairs are brighter). Now that you know that, all the goats MUST be photographed with the sun located behind and to the right of them. Yes, expert editing do require photography skills ;-) Unfortunately, this is not always the case in your entry: the front right goat is lit from the left, the one in front of the right yellow panel is lit from (upper) front, the goat on the left of the roof is lit from the left. From there, unless you are very good at artificially relighting a subject (it can be done to some extend, but requires some experience and can look quickly fake), just grab your camera and take other photos with your light direction constraint in mind.
2) Light intensity
There is a very simple rule: the closer to the source, the brighter. In your entry, this rule is not always respected: look at the goat to the right on the roof: it is darker that the one to the left, which is not logical since the main light source is to the right. You need to make sure to "sort" brightness levels accordingly to the main source location.
3) Shadows (direction and intensity)
Just like for the light, direction and intensity are the keys. First, direction. Since the main source is behind and to the right, your shadows need to go towards the front left. Look at the playground, its shadow is cast in front of it. The shadows you created go to the left, but not to the front, which is why they are not convincing enough. Moreover, your shadows are too intense. For shadows, the intensity rule in inverted: the closer to the source, the darker. And of course, shadows far away from the source should be less intense (i.e. less dark). If you compare the natural shadows of the playground to the front goats' ones, you'll notice that your shadows are darker, which is not logical.
4) Depth of field
It is important to also keep in mind the location of the focus plane, and add elements accordingly. In your entry, you can clearly see that the foreground of the playground photo (the sand) is out of focus. Since the front goats are located there, there is no way for them to be sharp. The problem is very obvious if you look at the front goat's leg, which is super sharp against blurry sand. From there, you have 2 possibilities: either blur the goats, or make the foreground sharp. Of course, your picture would look bad with blurry front goats, since they are the main subjects. As a consequence, you must use a "background photo" with sharp foreground. Did I say expert editing also require photography skills? (sorry, couldn't resist, hehe). Anyway, if you know that you will position subjects in the foreground, take a photo with very narrow aperture (I don't hesitate to go to f/22, and correct chromatic aberrations in Adobe Camera Raw: works very well, especially in the recent version). This can imply using a tripod and a remote. If f/22 is not enough, you can even use focus stacking methods (but you will need a tripod too, of course).
5) Atmospheric depth
This is not that relevant in your entry, but can be useful if you want to compose a picture with items positioned very far away in the background. Air is not transparent, even when there is no rain, fog, clouds, nor anything. Air make things less contrasted, a bit like if a white filter was between you and the item. This is often obvious on landscape shots: mountains in the background are much less contrasted than things in the foreground. I emulated that in my own entry: if you look at the trees at the end of the path in the background, you'll see that they are bathed in a greyish atmosphere, while the foreground plants are dark and well contrasted.
6) Color balance
(Note: You did that very well, so I just talk about it in a general way.) Make sure to keep color balance consistent throughout all the items of the picture. In my entry, I knew I wanted the light to be cyan, so I adjusted the color balance of each shot accordingly: if you look at the plants, the light reflections on them are cyan, not white. It can prove to be hard to do precisely on each item separately, and require a good eye. What I usually do is adjust it on the separate items the best I can, then I add global adjustments layers over everything. In my entry, there is a cold blue "Photo Filter" layer above everything: it helps unifying all the underlying layers in the same tints.
7) General hints
As you realized, there are several things you must know before grabbing your camera:
- Main light location. This is super important, and you must take all your photos with the main light in the same relative position. With animals, children, or anything moving fast and hardly controllable, it can be a nightmare. Good luck :) For convenience, I shot everything I can (small objects, models, etc.) in my home studio, so that I can precisely adjust lights intensity and positions.
- Composition. If you don't know where your items will be positioned in the final image, chances are you won't be consistent focus-wise or light-wise. I usually sketch my composition beforehand (very roughly), so that I have all that information. If unsure, take photos with everything sharp: while you always can add some blur effect afterwards, if you need things sharper (as for your entry's foreground), you're stuck.
Also, take your time when editing, and regularly ask yourself the questions we mentioned:
- Are my items lit from the right direction?
- Are my items lit with the appropriate intensity? (the closer to the main light source, the brighter)
- Are my shadows going towards the appropriate direction (opposite of the main light source location)
- Are my shadows intensities appropriate? (the closer to the main light source, the darker)
- Is my depth of field consistent? (no sharp items where the main photo is blurry, no blurry items where the main photo is sharp)
- Is my color balance consistent? (no items lit in blue when the main light is yellow, etc.)
- Are my items in the far background less contrasty than the ones in the foreground? (especially in landscapes)
Hope this helps! |
|
|
|
05/03/2012 06:51:47 AM · #23 |
What a great post Christophe!
|
|
|
|
05/03/2012 06:56:40 AM · #24 |
| Wow, that post should be a sticky. Great information and thanks for taking the time to post that. |
|
|
|
05/03/2012 08:24:16 AM · #25 |
Wow, Christophe! Thanks so much for such a detailed post (and your English is perfectly fine :-) jammed with all kinds of useful hints. Yep, you're very correct about not forgetting the photography skills even with Expert, esp regarding the sand in the f/g losing focus. Especially as I was shooting wide angle, it would have been so easy to close down and get complete front-to-back focus.
You're right, my initial idea was somewhat ambiguous, I knew what I wanted to do but waited til I got the shots of the goats doing their thing before deciding where each would be placed.
There is a tree to the right and front of the playground, and its shadows on the ground were rather soft as the branches are high. So I reasoned that the goats' shadows would be relatively dark and hard-edged as I shot both playground and goats between 11:30 and 12:30 to try and match the light. Of course there was no control at all in terms of the goats, they just ran around, jumped, climbed on things (including me).
And I am glad to see that replies to my request for help with PS, pays off in that other people read and benefit from responding posts like yours. Again thank you very much for your feedback and the technical info. |
|


