
| You are not logged in. (log in or register) | |
|
|
Tutorials :: Insect Photography
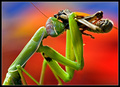
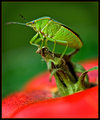
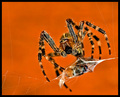
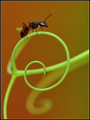
Insect Photography by DrAchooWhen I'm not shooting landscapes, I like to pull out the macro and shoot insects. They look so otherworldly when close-up and there almost always seem to be some around for subjects. I thought I'd share some tips for those who want to take their first steps into photographing these interesting critters. Tip One: Cooling bugs We all know that part of the challenge of macro photography is the thin DOF. Gaining a proper DOF and composition is even harder when your subject is moving. One way to put the odds in your favor is to cool your model down so they lack the energy to move quickly or escape. The trick is finding the right time so they slow down long enough, but you don't kill them by accident. Generally speaking, the time you want them in the fridge/freezer is based on their size and heft. Large, solid insects like dragonflies will take longer than small delicate ones like damselflies. I usually put the bug in a bug jar or small Tupperware container and then check on them with the following timetable: Large insects: 5 minutes (dragonflies, bumblebees, butterflies) Medium insects: 3 minutes (shield bugs, ladybugs, large spiders) Delicate insects: 1 minute (damselflies, crane flies) Each time interval, open the fridge and check on the bug. If they are still walking around, they aren't close. If they are pretty still, but clinging to the side of the dish, they are close. If they are very still and aren't clinging to anything, they are just right (as long as they aren't dead). The first few times you may lose your bug, but other times you will swear that you killed it, only to have it revive when it warms up and go on like nothing happened. Some bugs don't necessarily need cooling because they are slow or don't like to fly. These are great bugs to start on as well. Mantids, ladybugs, and shield bugs are some of the local insects I find to be easier to shoot. Garden spiders are also good to start on as they like to stay still on their web (as long as the web isn't blowing in the breeze). Tip Two: Controlling Your Background One nice thing about macro photography is you can shoot almost anywhere because the background often blurs into oblivion. One idea for the beginner is to find the flower/leaf/stick that you want to shoot your insect on and put it in a vase which is sitting on a piece of matboard (or something similar). This way, you can spin the base to get the best composition or to keep your bug in the viewfinder without moving your camera (which is often on a tripod). This simple set-up also allows you to shoot more than one bug in the same sitting with quite different backgrounds (if you wish). Another trick is what I call "ant island". Place your prop (large rock or leaf or stick), on a cookie sheet and fill the sheet with water. If your subject can't fly or swim, they are captive and you are welcome to shoot away even if the bug is working at full speed. Ants can be interesting to shoot this way, although you still have the challenge of getting the focus just right while they are moving around. The more ants, the merrier. Tip Three: DOF, Focus, and Bug Wrangling Like any portrait, I find the most important thing to have in focus, are the insects eyes. With that in mind, it's fairly important to have your bug facing you for your photo. I will often "wrangle" the bug with one of those wooden sticks you use for shish-kebabs. You can use the pointy end to gently nudge your subject into just the right place or to turn them around if they are walking off the set. It also helps to know that most insects have the urge to climb upward. With this in mind you can allow the insect to climb up the stick and then exit off the stick onto just the right spot on your prop. Be aware though, some bugs (like ladybugs) will want to fly away if they sense they have reached the top of whatever they are on. Often it's satisfying if you can get the entire bug into the DOF, but it's not necessary at all, and the most creative shots take advantage of the shallow DOF. Remember, the smaller the aperture, the larger the DOF, but also the slower the shutter speed. Have fun and be patient! After a while you will want to try going after "wild" bugs which can be very frustrating/rewarding. Some of the many bugs I've caught over the years: 
Home -
Challenges -
Community -
League -
Photos -
Cameras -
Lenses -
Learn -
Prints! -
Help -
Terms of Use -
Privacy -
Top ^
DPChallenge, and website content and design, Copyright © 2001-2024 Challenging Technologies, LLC. All digital photo copyrights belong to the photographers and may not be used without permission. Current Server Time: 04/16/2024 04:41:42 PM EDT. |