
| You are not logged in. (log in or register) | |
|
|
Tutorials :: How To Shoot Waterfalls
How To Shoot Waterfalls by DrAchooI seem to have had some success in shooting waterfalls. I thought I’d share some insight and tips as this can be a great way to get those “ooh” and “ahh” comments from your friends without too much difficulty. Step One: Move to Oregon. Just kidding, but the Columbia Gorge definitely has the largest selection of waterfalls I’ve been around. Not only that, they exist less than an hour from a major city and many are not far off the highway. Step Two: Choose your waterfall and categorize it. Not all waterfalls are built the same. I would generally split them into four groups based on their water volume (low or high) and the amount of rock the water interacts with (none or low to high). The best way to photograph the fall depends on what square it falls into. The season may change the same waterfall from one category to another and can definitely affect the way a fall looks. Ignoring the processing, look at the difference in water volume between these three shots of Multnomah. The first was taken after 26 straight days of rain, the second in late spring, the third in late August. 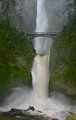 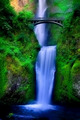 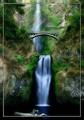
Low flow, high rock interaction: This combo makes for some of the prettiest waterfall shots. The low flow allows for longer shutter speeds without blowing your highlights. The long shutter speed makes these falls look very silky and graceful. 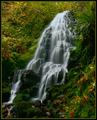 (1.3 sec @ f/22) (1.3 sec @ f/22)
High flow, high rock interaction: More difficult, but still allows for a nice silky look. The higher the flow, the shorter your shutter speed needs to be. Too long and the flow blows into uniform white highlights. The rock interaction splits the water and allows somewhat longer shutter speeds because the water is already being split up (thus giving you a little more wiggle room before it all blends together) 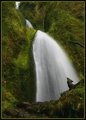 (3.2 sec @ f/18) (3.2 sec @ f/18)
Low or high flow with low rock interaction: These, to me, are the toughest to photograph. Slow shutter speeds make the fall turn into a straight white line. Sometimes this can look good, but often it winds up being uninteresting. This is an example where a fast shutter speed can be helpful. Freezing the water gives it texture. The higher the flow and the less the rock interaction, the better I think freezing the water works. 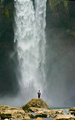 (1/200th @ f/6.3) (1/200th @ f/6.3)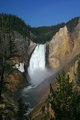 (1/200th @ f/11) (1/200th @ f/11)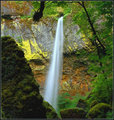 (1 sec @ f/22) (1 sec @ f/22)
Equipment needs: A tripod is almost a necessity unless you are shooting to freeze the water. Any slower speed will require a tripod. A polarizer and/or ND filter is also very welcome. Shutter speeds I’ve found that work the best are between 0.5 and 4 seconds. The polarizer will take away some spectral highlights (but not as much as you may be used to in the sky or on flat water) but will provide 2 stops of light blockage. If you need more to get to the required shutter time then you need to add a ND filter. I’ve found that between 2 and 6 stops total gets me where I want to be most of the time. Lenses with a wide angle are often needed for larger falls. Best time of day: Waterfalls enjoy overcast days and indirect light. If you have direct sunlight you will get blowing of highlights very, very quickly. You can boost contrast and saturation later in PP. This is an example of a shot done on a completely overcast day. Ultimately the direction the waterfall faces will dictate when is the best time to shoot. This is probably another reason Multnomah is such a photogenic waterfall, it is nearly never in direct sunlight. 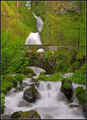 (1/4 @ f/22) (1/4 @ f/22)
Post Production: This depends on taste, of course, but one trick is to do a lot of masking of your water. You want the water to be pushed as close to white as possible without blowing (and removing detail). Often adding contrast, saturation or other common PP tricks to the rest of the picture will blow your fall. Masking therefore becomes essential. I have tried adding a little blue to the water with color shift with mixed results. Some people liked it while others didn’t. My latest shot was purposely pushed to surreality to look like something out of a fantasy world. It was done with lots of saturation and contrast masking while masking off the fall. I added a fair amount of blue to the water in this one as well. (0.4 sec @ f/4)
Hope this is helpful to people. If there are areas I didn’t hit or questions people have, I’d be happy to address them and update the tutorial as necessary.
Home -
Challenges -
Community -
League -
Photos -
Cameras -
Lenses -
Learn -
Prints! -
Help -
Terms of Use -
Privacy -
Top ^
DPChallenge, and website content and design, Copyright © 2001-2024 Challenging Technologies, LLC. All digital photo copyrights belong to the photographers and may not be used without permission. Current Server Time: 04/19/2024 11:13:06 PM EDT. |