| Author | Thread |
|
|
02/13/2008 04:28:42 PM |
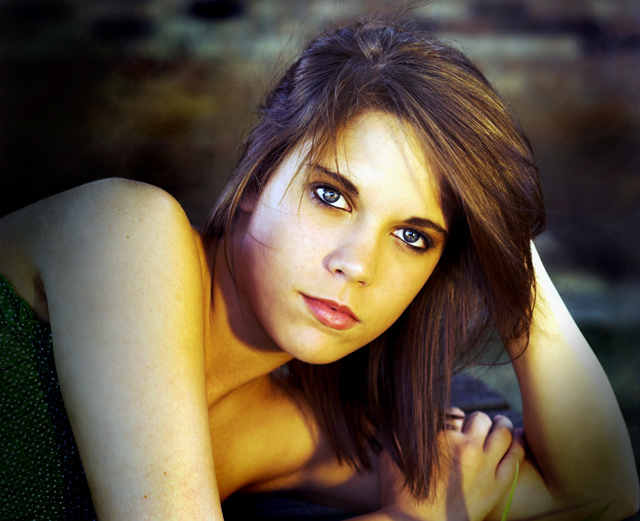
And with the cloning you asked for and a "few" extra steps:

Then an alternate crop with presentation:
*grin*
|
|
|
|
02/13/2008 09:35:11 AM |
the gold = a GOLD reflector...and I left it because she liked it rather than take the gold/yellow tent out... ;-) she was laying across a picnic table at the church...Brad, as I've told you all my life..I'll shoot 'em you PP 'em. YOU KNOW I don't like the PP part ;-) love to all! S
Message edited by author 2008-02-13 09:36:52. |
|
|
|
02/12/2008 08:02:35 PM |
Hiya Sonya!
Nicely posed shot and love the lighting here.
As others have mentioned, there is a very unnatural yellow color cast to her skin. Not sure if it's your monitor calibration or not. To get her skin in the realm of more natural in appearance did this:
Image, Adjustments, Selective Color, dropped-down to the Yellow channel and made the following adjustments: Cyan 0 | Magenta 0 | Yellow -50 | Black +10 | click OK. Then Image, Adjustments, Hue/Saturation, drop-down to Yellow and made the following changes: Hue -14 | Saturation +7
That will get the skin very close to a neutral look. Don't be afraid to use the Shadow/Highlight, show more options, see that the settings are at 0 | 50 | 30 & 0 | 50 | 30 & +20 | 0 & 0.01% set in both boxes, then click the set as default. At that point play with the Mid tone Contrast a little and it will soften her skin a bit and give it a little glow (about +15). :Last but not least is to go Image, Adjustments, Photo Filter, and accept the default Warming Filter, set at 25%, with Luminosity preserved selected, even sliding it to 40% is a still natural and warm tones always look nice like this.

Try the steps here and see what you think. My monitor is calibrated with a Spyder3, so I know what I am seeing is right, and with only a few clicks, can get to this, all in basic editing too.
Message edited by author 2008-02-12 20:28:54. |
|
Comments Made During the Challenge  |
|
|
11/07/2007 02:10:29 PM |
"Class of 2008" it was a small class . . but they were certainly pretty :- )
Very nice portrait |
|
 Photographer found comment helpful. Photographer found comment helpful. |
|
|
11/06/2007 06:20:19 AM |
| a bit too yellow for my taste |
|
| Photographer found comment helpful. |
|
|
11/03/2007 01:41:58 AM |
| Your colors appear unnatural, though it looks intended. I'm not of the opinion that it makes the image better. |
|
| Photographer found comment helpful. |
|
|
11/02/2007 07:00:40 PM |
| Feels like an evening or sunset time frame photo. Overall image has a bit much, for me anyway, of an orange hue. BB |
|
| Photographer found comment helpful. |
|
|
11/01/2007 06:46:34 PM |
| nice pose but too much yellow tint on her skin |
|
| Photographer found comment helpful. |
|
|
11/01/2007 03:01:34 AM |
| the yellow really bothers me |
|
| Photographer found comment helpful. |
Home -
Challenges -
Community -
League -
Photos -
Cameras -
Lenses -
Learn -
Prints! -
Help -
Terms of Use -
Privacy -
Top ^
DPChallenge, and website content and design, Copyright © 2001-2024 Challenging Technologies, LLC.
All digital photo copyrights belong to the photographers and may not be used without permission.
Current Server Time: 04/24/2024 06:11:54 PM EDT.