| You are not logged in. (log in or register) | |
|
|
How'd They Do That? :: Inverted Symmetry
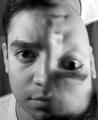
Inverted Symmetry by K-RobThe first impression that most people got when they first viewed the picture was that it was accomplished with a Double Exposure. In actuality it was a simple extended exposure with a very low tech approach. I’ll briefly explain below. First: I measured the distance of how far away I knew that I would be from the camera and got a good focus. I then switched to manual to ensure that it would stay there. In order to get the distance for the focus right I used what would end up being my light source, a long tipped lighter used to light candles from a safe distance. I placed the lighter directly in front of the camera and focused on an object I placed at the end of the lighter then set the camera to manual. You can probably tell by now that I’m not a pro by any means and do not have anything that even resembles a studio. I then set the following exposure: F5, 12 sec, ISO160. I placed the camera on the end of a counter, set the self timer to 10 seconds, turned off the lights in the room and positioned myself in front of the camera using the lighter as I did to set the focus. I held the lighter to the right side of my face then turned it on when I heard the shutter open. I had the lighter on for approximately 3 seconds. I then turned the lighter off and physically grabbed the camera and flipped it so that I was now upside down. 

I positioned it a as close as I could to the original location then turned the lighter on again for approximately another 3 seconds. That’s it for the actual exposure. As you can imagine, this took several shots to get it quite right and below are some “out takes” that occurred while trying to get the shot right. 

If you look closely at the first picture you can just make out the left side of my face (right side in the picture) that is in the dark. Below is the final shot that I used.  Next were the basic Photoshop adjustments. It will be hard to tell from the image above but the full size original shows more of both sides of my face on the lower and top corners but the adjustments I used seemed to make the disappear without much effort. I used Autolevels to get the color more accurate then cropped the image. Once I had it to where I liked it I tried different variations of odd colors but in the end I decided to de-saturate the picture and submit it as a black and white picture.  Final Image.
Home -
Challenges -
Community -
League -
Photos -
Cameras -
Lenses -
Learn -
Prints! -
Help -
Terms of Use -
Privacy -
Top ^
DPChallenge, and website content and design, Copyright © 2001-2024 Challenging Technologies, LLC. All digital photo copyrights belong to the photographers and may not be used without permission. Current Server Time: 04/18/2024 05:04:19 PM EDT. |