| Author | Thread |
|
|
06/06/2009 01:01:54 AM · #1 |
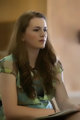
Ok, ive read countless articles and tutorials on the subject, but i still seem incapable of basic "model" edits.
heres my recent multi-hour long edit that i hate
original edit
  |
|
|
|
06/06/2009 01:02:24 AM · #2 |
| oh, and if someone will help me and give some advice i would really really appriciate it |
|
|
|
06/06/2009 01:25:33 AM · #3 |
Don't over analyze the shot when you edit. Feel the mood. Here you have a natural light coming in giving a sort of nice reddish glow, go with it... The young lady is so involved with whom she is listening to it is almost like a dream. Go with it, lets not take her to a hard (sharpened) colder environment, lets put her in that dream place.
Lighten the shot up a tad bit with Levels and/or curves then dup the layer, On that dupped layer apply Gaussian blur @ about 8-10 then bring the opacity down around 38... the skin will soften the room will glow. Merge it down when you get it where you want it.

I might have done some more smoothing and such but this was a quick take to get you going a different direction.
Message edited by author 2009-06-06 01:30:49. |
|
|
|
06/06/2009 01:27:34 AM · #4 |
Originally posted by awpollard:
Don't over analyze the shot when you edit. Feel the mood. Here you have a natural light coming in giving a sort of nice reddish glow, go with it... The young lady is so involved with whom she is listening too it is almost like a dream. Go with it, lets not take her to a hard (sharpened) colder environment, lets put her in that dream place.
Lighten the shot up a tad bit with Levels and/or curves then dup the layer, On that dupped layer apply Gaussian blur @ about 8-10 then bring the opacity down around 38... the skin will soften the room will glow. Merge it down when you get it where you want it.
|
Ah, you used the Dorothy-in-the-Wizard-of-Oz filter. great choice!!! |
|
|
|
06/06/2009 01:29:11 AM · #5 |
Originally posted by awpollard:
Don't over analyze the shot when you edit. Feel the mood. Here you have a natural light coming in giving a sort of nice reddish glow, go with it... The young lady is so involved with whom she is listening too it is almost like a dream. Go with it, lets not take her to a hard (sharpened) colder environment, lets put her in that dream place.
Lighten the shot up a tad bit with Levels and/or curves then dup the layer, On that dupped layer apply Gaussian blur @ about 8-10 then bring the opacity down around 38... the skin will soften the room will glow. Merge it down when you get it where you want it.
I might have done some more smoothing and such but this was a quick take to get you going a different direction. |
see! you did that awesome edit in like a minute and im incapable of doing it in an hour. ugh |
|
|
|
06/06/2009 01:30:13 AM · #6 |
| its really weird, there are two girls in the same pageant that are eerily similar to dorothy. makes for fun photos though, they're both gorgeous |
|
|
|
06/06/2009 01:33:16 AM · #7 |
|
|
|
06/06/2009 01:45:37 AM · #8 |
I am very new to portrait editing as well. I have found the tutorial in this thread useful: Touching up Portraits: The Beauty Parlour Analogy!. These techniques can be applied fairly quickly once you get used to them. They help with quick edits.
Now I am not a pro like a lot of others here on DPC, but here is my quick attempt and applying some edits to your photo:

And what I did:
Auto Levels
Healing Brush on scar on forearm
Copied Layer
Applied Gaussian Blur
Masked Gaussian Blur layer to only bring out skin
Turned opacity on Gaussian Blur layer down to 50% then merged down
Copied Layer
Dodge white of eye
Burn eye line
Turned opacity on Dodge/Burn layer down to 30% then merged down
Ran the Blur tool around outline of hair to help hide some of the flyaways.
That�s it.
One thing I have been doing a lot here lately is I do most of my work in a copied layer, then will turn down opacity and merge down to give a more natural look. This seems to be helping me the most.
I hope that makes sense and is helpful.
|
|
|
|
06/06/2009 01:52:41 AM · #9 |
| how do i do smoothing awpollard? |
|
|
|
06/06/2009 02:47:44 AM · #10 |
Did you end up getting Lightroom? I remember you were asking about it a while back.
There is an interesting video Terry White put on his blog a few months ago -- Use Lightroom 2 for Basic Portrait Retouching -- that I found interesting.
I do very limited modeling/retouching (usually just headshots for actors), so I'm not a great resource -- but I thought that video was a good place to start and/or get some inspiration from. Shows some great uses for the local adjustment brushes in LR2, also.
|
|
|
|
06/06/2009 10:01:10 AM · #11 |
Originally posted by JDubsgirl:
how do i do smoothing awpollard? |
On the shot that I posted I only used the Digital Camera Noise Reduction in PSP X2 to smooth. I then use smoothing brush to fix any jaggies or artifacts caused by resizing.
Now if I was working on the big shot and was going to take my "Lazy" (time saving) method I would create a layer and apply one of two presets from Topaz Adjust. Simplify or Flat and Smooth, both do amazing things when it come to smoothing skin. Topaz Adjust is really a Contrast Enhancing plug-in so it will lighten the shot through the process.
Topaz Adjust -> Simplify; gives a nice even smooth feel with shadows and slight grain, that all one really needs to do is adjust the opacity of the layer.
Your original with only Topaz Adjust -> Simplify

Topaz Adjust -> Flat and Smooth; really smooths the layer, almost baby butt smooth. Skin comes out nicely but detail in the over all shot is lost. So if I go this route: I will adjust the layer's opacity and mask/erase detail back in...which is almost everything but the skin.
Your Original with only Topaz Adjust -> Flat and Smooth.
A couple minutes of masking and/or erasing and layer opacity level and boom... pretty close to done.
Message edited by author 2009-06-06 10:01:32. |
|
|
|
06/06/2009 10:32:14 AM · #12 |
You know how to do it.....a bazillion hours of practice.
I have what I deem to be no talents or training, yet over the last three years I've gotten better at it.

It really is a matter of sitting down and painstakingly working with it 'til you get it right.
Yeah, there are stone naturals at it (HATE 'em, LOL!!!), and they can do a bang-up job in three minutes flat, but for the rest of us, practice and patience are what works.
Katherine, you WILL get it.....you're good enough, but give yourself a break.......8>)
Message edited by author 2009-06-06 10:34:45. |
|
|
|
06/06/2009 10:36:47 AM · #13 |
OH MY GOD! Why would anyone blur the F out of that pretty young girls face? Seriously, just because you are editing a face doesn't mean it needs blur or hours worth of editing! It looks freakish. What you need to do first is adjust the white balance of the shot BIG TIME It's overly green. Also, if you shot in RAW, up the exposure because it's way too dark. THEN, maybe do slight healing on any imperfections on the face. It doesn't appear that she has any though. Just bump up the basics (levels, curves, contrast) and you'd be left with a nice photo of a pretty girl.

Here's my take, which is in no way trying to be all perfect, just trying to show you that she's pretty enough without gaussian blur, or that crazy topaz stuff. |
|
|
|
06/06/2009 10:39:20 AM · #14 |

Did a very brief dodge and burn. I think the biggest issue for this image is not the retouching, but the image itself. The lighting is very poor on the mask of the face which is going to lead to a decrease in image quality when you start editing. For general blemishes I would use the patch tool for the most part. Dodging and burning on a new layer set to blend in 'luminosity' will create tone changes without affecting color. Much of my experience is just from trying different things, i've picked up a few techniques that are very helpful but a little long to post here, or im just too lazy anyhow ;) |
|
|
|
06/06/2009 11:21:45 AM · #15 |
AMEN to what  Rompy said. just keep your editing basic and simple, don't overdo any kind of selective dodging/smoothing/blurring and you're good to go (unless you want your model to look like a plastic doll). nice side effect with that: you won't waste hours of editing ;) Rompy said. just keep your editing basic and simple, don't overdo any kind of selective dodging/smoothing/blurring and you're good to go (unless you want your model to look like a plastic doll). nice side effect with that: you won't waste hours of editing ;)
eta: here's my shot on a b&w version:
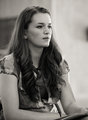
editing steps:
save as tiff
few touch up's with the spot healing brush
b&w adjustment layer with reds and yellows at 84%/127%
curves layer to brighten up the midtones
gradient map layer on soft light mode for some more contrast and the warm toning
curves layer to very subtly brighten up her eyes
add slight vignette via another curves layer and radial gradient mask
Message edited by author 2009-06-06 11:39:26. |
|
|
|
06/06/2009 11:44:45 AM · #16 |
| Yes, B/W would be an excellent choice as the colors are not ideal. |
|
|
|
06/06/2009 11:50:03 AM · #17 |
Originally posted by Mephisto:
eta: here's my shot on a b&w version:
|
Lovely! |
|
|
|
06/06/2009 11:51:55 AM · #18 |
Took a quick shot at it. Gotta runb now, details later if anyone's interested:

R.
Message edited by author 2009-06-06 11:52:05. |
|
|
|
06/06/2009 02:18:09 PM · #19 |
I made her a redhead!

I Topaz Denoised her in sections
- Background
- Arms and leg
- Shirt and hair
- Her face minus eyes and lips
Boosted brightness and added some contrast
Healed a scar on her forearm
Healed out some grey shadows on her face
I boosted the red in her lips and cheeks
I lowered the sun glare on her cheek with Selective Color on the white layer
Boosted the blacks a bit in Selective Color also
Boosted the saturation of her eye color
Whitened the whites of her eyes with the Dodge tool
Overall contrast boost
Selectively sharpened her eyes and lips
Made her a redhead by selecting her hair and adjusting the hue. I also did her eyebrows the same way. |
|
|
|
06/06/2009 02:24:30 PM · #20 |
Originally posted by aliqui:
I made her a redhead!
|
Whoa!
She looks beautiful like that!!!! |
|
|
|
06/06/2009 02:30:53 PM · #21 |
the magic of a portrait is when you press the shutter not in the editing.
nothing wrong with a little bit of color correction but making people look like plastic, or redheads, isn't true to them or to anyone else.
Work on your lighting, and the moment that you capture. Get her to get into it. A good portrait is a collaboration. |
|
|
|
06/06/2009 02:32:20 PM · #22 |
Originally posted by NikonJeb:
Originally posted by aliqui:
I made her a redhead!
|
Whoa!
She looks beautiful like that!!!! |
That's exactly what I said. I initially was just going to give her "highlights" of sorts, because in the original her hair is kind of washed out. I moved the Hue slider just ever so slightly, and BAM! All the highlights and lowlights came out on their own with just that simple adjustment. |
|
|
|
06/06/2009 02:34:24 PM · #23 |
Originally posted by petrakka:
the magic of a portrait is when you press the shutter not in the editing.
nothing wrong with a little bit of color correction but making people look like plastic, or redheads, isn't true to them or to anyone else.
Work on your lighting, and the moment that you capture. Get her to get into it. A good portrait is a collaboration. |
Party pooper, heh |
|
|
|
06/06/2009 03:07:56 PM · #24 |
| ok so i need an opinion or two. should i just order the bundle package from topaz? it seems like everyone loves it, and im sure its something i would use massively if i bought it. heres the link |
|
|
|
06/06/2009 03:10:19 PM · #25 |
Originally posted by JDubsgirl:
ok so i need an opinion or two. should i just order the bundle package from topaz? it seems like everyone loves it, and im sure its something i would use massively if i bought it. heres the link |
Why don't you try the 30 day free trial first? Personally, I love it. |
|
Home -
Challenges -
Community -
League -
Photos -
Cameras -
Lenses -
Learn -
Prints! -
Help -
Terms of Use -
Privacy -
Top ^
DPChallenge, and website content and design, Copyright © 2001-2024 Challenging Technologies, LLC.
All digital photo copyrights belong to the photographers and may not be used without permission.
Current Server Time: 04/19/2024 03:11:33 PM EDT.


