| Author | Thread |
|
|
03/04/2008 07:39:29 AM · #1 |
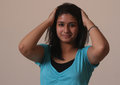
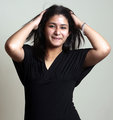
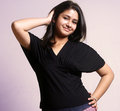
I used single studio light for the first time and shot some pictures. I am just confused how to process them for better results. here are 4 samples without any kind of work on photoshop. These images are just cropped and saved for web. Any suggestions will be welcome
  |
|
|
|
03/04/2008 08:16:34 AM · #2 |
Check out Photoshopmama on Youtube. She has some great tutorials on model makeovers. Sorry for the short answer but do a search for "Photoshopmama".
hope this helps
|
|
|
|
03/04/2008 08:25:12 AM · #3 |
I felt #2 needed the most work but still had potential. Here are the steps I took:
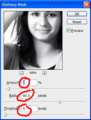
First, there was an overall cast to the image that I didn't like ... and I didn't want to take the time to correct. So I thought that a B&W treatment of the image would be quickest and result in a nice looking image. So I used Photoshop CS3's new B&W Adjustment Layer and adjusted just a couple of tones like this:
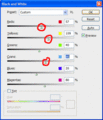
My main interest in the above changes was to adjust skin tones (red and yellow), but I also touched the color of her blouse just a bit. The rest of the settings were CS3 defaults.
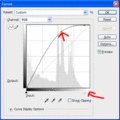
Next, the overall brightness of the image needed to be raised. So I used CS3's Curves Adjustment Layer which is sort of a combined Levels and Curves dialog. You'll see down at the bottom that I first adjusted the overall brightness by moving the bottom slider to the left. This has the same result of doing the same thing in Levels. Then, to raise up the mid-tones, I created a fairly large curve as shown here:
I still wasn't happen with the highlight tones. So I created a second layer of the image. And used the Shadow / Highlight adjustment on it. I didn't want to lighten the shadows, so I turned it all the way off. I only wanted to deal with the highlights and i moved it all the way to the right as shown here:
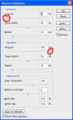
At this point, I have four layers. The original at the bottom, the Shadow / Highlight adjusted layer above it. And the two adjustment layers at the top. You can see my working environment here:
Finally I flattened the layers and then applied what is sometimes called "Local Contrast USM". It's basically USM (Unsharp Mask) but with a small amount applied to a wide area as follows:
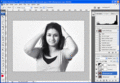
And here is the resulting image:
[thumb]654438[/thumb]
Message edited by author 2008-03-04 08:56:35.
|
|
|
|
03/04/2008 08:31:35 AM · #4 |
Wow, David, talk about above the call of duty. Nice post!
|
|
|
|
03/04/2008 11:50:30 AM · #5 |
Originally posted by dwterry:
I felt #2 needed the most work but still had potential. Here are the steps I took: |
Thanks a lot David for the time and effort you took to pep up the image. This is my first shoot with my new studio light (which i bought after getting motivation from DPC). After strulling a lot with exposures and shutter speeds i clicked a lot of pictures but was wondering if i have done it right. I'll post some of the pix for your comments soon
Message edited by author 2008-03-04 11:51:38. |
|
|
|
03/04/2008 12:04:40 PM · #6 |
Great post David!
I have a question about the 'local contrast USM'. I'm not familiar with that technique. What are it's advantages? Why would you use it? For example, why did you choose that for this image? |
|
|
|
03/04/2008 12:09:19 PM · #7 |
Originally posted by Strikeslip:
Wow, David, talk about above the call of duty. Nice post! |
I second that. Nice mini tutorial! |
|
|
|
03/04/2008 12:57:49 PM · #8 |
Originally posted by LVicari:
Check out Photoshopmama on Youtube. She has some great tutorials on model makeovers. Sorry for the short answer but do a search for "Photoshopmama". |
Wow, neat, I'll have to watch some of those.
If you want a chuckle, try You suck at photoshop. |
|
|
|
03/04/2008 01:16:22 PM · #9 |
Originally posted by taterbug:
I have a question about the 'local contrast USM'. I'm not familiar with that technique. What are it's advantages? Why would you use it?
For example, why did you choose that for this image? |
I'll apply a small amount of "local contrast USM" to every image. It emphases the contrast between lights and shadows within an image, which effectively gives it a little bit more of a 3D appearance.
The one thing I would caution is to not over do it. You can see that I picked a value of 8 for this application. I use something around 8-10 most of the time. For regular USM (to sharpen an image), the value is much higher. But high values over a wide radius can create a really funky looking image.
Anyway, play with it ... pull up an image, open the regular Unsharp Mask dialog, put in the values 8, 60, 0 and then hit turn preview on and off and watch the changes. I think you'll like it.
|
|
|
|
03/04/2008 01:19:13 PM · #10 |
Originally posted by manish:
After strulling a lot with exposures and shutter speeds i clicked a lot of pictures but was wondering if i have done it right. |
The other images look better. The one I picked really needed to have better light. If you can afford it, use a Light Meter to set your exposure. Your camera's metering system can't see the flash so you're left guessing the exposure based on a histogram. And if you do it that way, you're better off shooting an 18% gray card.
|
|
|
|
03/04/2008 11:23:25 PM · #11 |
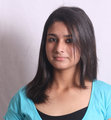
Here are some which i processed. Since i had no useful backdrop, the common thing i did in all of them was to
- select the background by magic wand tool and make a separate layer from it
- reduced the contrast and increased the brightness till the background disappeared
- flattened the image and adjusted the curves, contrast
- Applied small amount of USM
 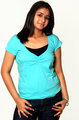
Do they look okay?
|
|
|
|
03/05/2008 09:23:19 PM · #12 |
Hi Manish,
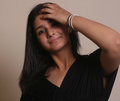
I've been wanting to try my hand at a full-on glamour edit, and your images are a good starting point. There is nice soft lighting on the subject. I picked your 3rd image and spent a few hours working on it...
--> to this --> 
I've included the editing steps in the comments. It was about 2 hours editing! (Note the disclaimer in the editing comments. :)
You edit's have improved the levels. The next most important thing for me is colour balance. Did you shoot the images on auto WB? Don't. :) Auto WB will be slightly different for every shot, and it's really hard to edit all the photos the same later on. I mostly use manual WB. Find out what is close for the setup (trial and error), and use that. I haven't used studio lights, but I would guess that flash WB would be a good setting. Ideally, you'd use a grey card and set a custom WB, but I don't bother with this. When editing, have a play with the colour balance adjustments and you'll be surprised how much improvement comes from tweaking these levels. Switch the preview on/off a lot to keep referring back to your original image as you make adjustments.
Backgrounds are tricky to deal with in editing. It's certainly better to get the background you want before you start shooting. Zero contrast backgrounds don't appeal to me. Gradient backgrounds are nice though, and I like what you've got in . The light and dark areas surround her pose nicely.
Message edited by author 2008-03-05 21:24:39. |
|
|
|
03/05/2008 09:37:30 PM · #13 |
Great makeover David, it look wonderful now. I am amazed how much an image can change by the right techniques of post processing. Surely a great learning exercise. Thanks for your effort.
|
|
|
|
03/05/2008 09:45:13 PM · #14 |
Originally posted by surfdabbler:
Hi Manish,
You edit's have improved the levels. The next most important thing for me is colour balance. Did you shoot the images on auto WB? Don't. :) Auto WB will be slightly different for every shot, and it's really hard to edit all the photos the same later on. I mostly use manual WB. Find out what is close for the setup (trial and error), and use that. |
I tried using the flash WB but most of these shots have been taking the Daylight WB as these strobes are daylight corrected [now whatever it means:(]. The flash WB was giving it an unnatural color cast
|
|
|
|
03/05/2008 11:15:50 PM · #15 |
Originally posted by surfdabbler:
I picked your 3rd image and spent a few hours working on it...
--> to this -->
|
I left a comment on the image, but wanted to say more publicly ... awesome work! You did a fantastic job of editing. There are many "makeover jobs" that I can't stand, because the person doesn't look real any more (plastic skin, etc). But I think you've done a superb job of keeping it real and yet going over the top with a beautiful makeover. Great job!
|
|
Home -
Challenges -
Community -
League -
Photos -
Cameras -
Lenses -
Learn -
Prints! -
Help -
Terms of Use -
Privacy -
Top ^
DPChallenge, and website content and design, Copyright © 2001-2024 Challenging Technologies, LLC.
All digital photo copyrights belong to the photographers and may not be used without permission.
Current Server Time: 04/17/2024 09:44:00 PM EDT.


