| Author | Thread |
|
|
08/02/2005 09:52:55 PM · #1 |
DPC Mentorship � Rules of the Road
Group: Double Exposure
Mentor: Graphicfunk
Students: Metoecus, Marjo, TeeQ, Britannica, loriprophoto, Jinjit, cpanaioti, RAJTOTLANI, dsa 157
sfalice, jrtodd, cbeller, wicketpete, suemack, AnNah, Joey Lawrence, keegbow, the Saj, akshayvh
If you like to be part of this group please email me and I will add you to list.
NON-MEMBERS PLEASE READ, TOO:
1. If you are not an active member of this mentorship group, please feel free to follow this thread. It is not intended to be exclusionary - we hope everyone can learn from it.
2. If you are not an active member of this group but have a question or comment, please send it directly to the moderator by Private Message. The moderator will either answer you directly or post your comment and their response to the thread. Thank you for understanding that we are trying to keep these groups small and on-topic. If this experiment takes off, we plan to start more groups to try to accommodate as many people as we can.
3. Mentors are volunteers with jobs and/or families. They're human too, and may make mistakes on occasion. If you feel the burning need to criticize them, point out a mistake, or point out your own infinately greater knowledge in they subject they are teaching, please do so in a PM to the mentor, not in this thread.
4. Have fun learning!
P.S. To see updated group information, see my profile. //www.dpchallenge.com/profile.php?USER_ID=37234
Message edited by author 2005-08-02 23:21:49. |
|
|
|
08/02/2005 09:54:10 PM · #2 |
First I like to thank everyone who has decided to explore this avenue. Welcome one and all.
As we all know, most digital cameras do not offer the feature of a double exposure. We accomplish this by leaving the shutter open. To achieve good results we will need to take full control of the lighting. While some natural light can be combined with artificial light, the ultimate control can best be accomplished with the latter.
It is here that our journey begins. If you want to sail you must understand the wind. If you want to master this topic you must understand artificial light. While natural light is complex, it serves the photographer well because it comes virtually ready for use because of its highly diffused nature. Artificial light is subject to the inverse square law. Natural light is not. While natural light gives you the most beautiful images, artificial light gives you the most expressive and highly dramatic studies. Artificial light is a potent tool for the artist. With it you can virtually sculpture a face to look its very best. You are in full control of the shadows, the midtones and the highlights. There is nothing like it for creative expression. However, many photographers find immediate frustration when they go indoors because problems appear fast. Such as what lights, what power and then results which are wanting. Strange, it never dawns on most people to simply buy three clamp lights and learn the basics. After this, the decisions are bound to be more intelligent and then you will be able to open up your goodies and start using them effectively. In short, there is much more to learn with artificial light because of the laws that govern it. Before we bite this bullit let us take a cursory look at the zone system so that we will be able to better communicate our ideas. Ansel Adams formulated the zone system. He used shades ranging from zero to 9. Later it evolved from one to 9. He used zero as absolute black. This scheme represents the tonal values in an image from the darkest to the lightest. Briefly here is the representation. For the sake of staying focused we will not get into its application, but we will use it to refer to certain tonal values.
Zone 1 the blackest black (absolute black for our purpose)
Zone 2 First discernable tones above total black
Zone 3 Average dark materials with good texture visible
Zone 4 Ideal shadows for portrait, landscape shadows and dark foliage. texture is even more visible.
Zone 5 Middle value of the scale as represnted by an 18% gray card. Usually most popular in many images.
Zone 6 Good skin tones but without glare. Closer to overcast lighting.
Zone 7 Average snow in raking sun. Good for bright colors and great textures in very light subjects even whites.
Zone 8 Glaring white surfaces and snow in flat sunlight. Very faint textures
Zone 9 absolute white.
Most meters expose for the 5th in order to give equal weight to the lower and higher zones. At times however, you will want to interfere and favor the 4th or 6th zone. Of course, experience photographers know instinctively when to under or over expose. Why is the Zone System important? That's because the mind is so quick to compensate and reconstruct and add missing information. Your sensor has a limitation and the zone system explains it. This will enable you with a little practice to see tones close to how the camera sees them and to visualize an end result according to the limitations of the medium. File this away for now. We progress now to the vital topic.
THE INVERSE SQUARE LAW
I would like this to be understood off the bat. Get this under your belt and it will make life easier and above all, it will make better images. It will also, along with the zone system, allow us to follow a natural stream into our dedicated subject: the double exposure.
Allow me to explain this to you in my own way and away from textbooks. To sink in the concept imagine that you have two clamp lights. each with bulb of 100 watts. Unlike in real life you are able to place these lights in your choice position and they will stay put. Imagine also a white dinner enamel plate. We currently have one light on and it is aiming at the plate that is being held with those plate holders used to prop up fancy collecters' plates. Your light is exactly one foot away and aiming at the center of the plate. Consider this 100 percent illumination. Now, what happens when you move the light back another foot? Think, the light is now two feet away...Would you believe that moving this light back one foot now leaves you with the plate receiving 25 percent! That is the inverse square. However, let us expand your understanding. We use the one foot as an arbitary number. What we actually did was the following: we moved the light back the exact distance it was from light to plate. Again: let us start with the light now at two feet from the plate. If we move the light back two more feet than the relationship is the same and yes, if it was at 100 percent at two feet it is down to 25 percent at 4. All we are doing is using the initial distance as the reference, whatever that is. If we bring it back an equal amount we are at 25 percent. You are doing a portrait, a head shot. You have one light 3 feet away from the subject, this is to cut down on the hot spots, and you want 1 to 4 ratio (very popular) your fill light then gets placed back at 6 feet from the subject. The first light is the 1 or the 100 percent and the fill light is at 25 percent or 1/4 the value of the main light because its distance is twice away. Now, if your main light is at onefoot away and the fill is at 3 feet then we simply take the 3 and square it which equals 9. The main at one foot and the fill is now 1/9. Naturally this 1 to 9 ratio will give you darker shadows which will begin to fall past the second zone. These ratios can be used for practical purposes and by pushing the extremes they can be used for special effects, dramatic effects, etc. While 100 watts bulb will limit you somewhat, they will nevertheless allow you to learn all the basics. The more area you want to cover, the deeper in your pocket will you have to reach. Lights come in all flavors and the most difficult to use are strobes. Yet, everything you need to know about ligth can be learned with just two clamp lights. Three is better. In the above example you can use the third to light the background. Of course in serious portraiture you may not want harsh direct lights. This means you will want to bounce the lights. Knowing how quickly they lose their power in direct proportion to the distance then you can see why you need either more lights or stronger lights. However, the same rules apply, but this is another adventure.
Now we swiftly move to the double exposure. This will come with a simple assignment. You can do this in no time flat. When you return with these efforts I will give you the full monte on the double exposure. You need to create a mask that will fit about your face. It will consist of the first and the 9th zones: white and black. Simple to make and I will give you several ways of making it. You need a finished size of at least 8x10. One way to do it is to use a piece of poster board. Cut it to a rough oval to fit your face. Bend this in half, better to measure and draw a line then to bend, then lay it on a table and paint (black magic marker) the right side black. So, one half is white and the other is black. When you place this on your face the black will be on the left side of your face. Another way is to use a paint program or ps and draw an ellipse and then place a dividing line and fill the right side with black and print. Make sure it is roughly 8x10. Then you can trim it to conform to your face. With this you are going to take two images in portrait mode (head shot) with a lighting ration of 1:4 and 1:9. Remember, the one is the fill light and the second number is the fill. Do not worry about glare for this exercise. the 1:4 means you place the main light 2 feet away and the fill, on the other side but 4 feet away. For the 1:9 you place the main light at 2 feet and the fill at 6 feet. For this example place the lights almost at eye level and in a v formation, where the bottom of the v or the joint is the subject. It will be one v with a longer extension. In both make sure that the main is aimed at the left side of your face.
Place your camera at its lowest ISO. If you are not able to go manual, then go shutter priority. You need at least a two second exposure. This may mean adjusting your main light. Do so, but then keep the fill light in the same relationship as explained above. You will need to place these two lights on an electrical strip. You are going to press the on switch. Place camera on timer, in prefocus. Place mask on face with the black on the left side of your face. When the timer opens the shutter remain still for about a second and then yank the mask off but keep face still. Finished. These results are needed so that we can proceed. They will give us a reference for us to take off from. These are not works of art. This is only a test. You will make the art later.
Yes, you are working in the dark. You may need to control a second light to position yourself. Find something. lol
Shortly I will post some images here for your study.
Message edited by author 2005-08-03 12:29:06. |
|
|
|
08/02/2005 10:11:22 PM · #3 |


[thumb]213379[/thumb]
These images: the water to wine, split boxer etc will be treaded at the very end for those interested. 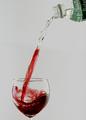 -- --
Message edited by author 2005-08-08 20:12:10. |
|
|
|
08/02/2005 11:13:18 PM · #4 |
Great lesson plan, Graphicfunk. Your examples are terrific.
I can hardly wait to go out and buy another couple of clamp lights and get to work/play. |
|
|
|
08/03/2005 03:22:24 PM · #5 |
Thanks Dan for the detailed explanation about lighting. I'm sure I'll get to learn a lot from you. Looking forward to it.
|
|
|
|
08/03/2005 09:51:32 PM · #6 |
| Great explanation and detailed lesson, Dan. Thank you so much for volunteering. Sorry for the late post...just got back in town. |
|
|
|
08/04/2005 12:45:52 AM · #7 |
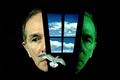
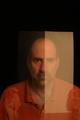
I guess I get to go first. Here's what I came up with.
[thumb]213680[/thumb]
Double Exposure Mentorship - 1:4 Illumination
[thumb]213681[/thumb]
Double Exposure Mentorship - 1:9 Illumination
|
|
|
|
08/04/2005 02:30:22 AM · #8 |
Congratulations to metoecus for having the courage to go first. (You've earned a spot on my favorites list for that one - besides I"m in awe of that flamingo shot). Okay, I'll go second:
Here's my try at 1:4
[thumb]213700[/thumb]
and at 1:9
[thumb]213699[/thumb]
And, with my compliments to Graphicfunk, um, You can do it in nothing flat; it took me a tad longer.
;>)
Message edited by author 2005-08-04 02:34:55. |
|
|
|
08/04/2005 02:56:10 AM · #9 |
| hey everyone, i was just about to do this assignment; and realized my tripod is in my buddys trunk from out shooting a couple days ago. will do my best to get it back and submit my shots tomorrow. i'm looking forward to this class! ~pete |
|
|
|
08/04/2005 03:35:17 AM · #10 |
Okay Dan just got mine done,
at 1:4
[thumb]213706[/thumb]
and at 1:9
[thumb]213707[/thumb] |
|
|
|
08/04/2005 04:01:47 AM · #11 |
Haven't got mine done yet, it'll be the weekend when I can get into town and grab a tripod. Am going to experiment with setting up lights till then, done very little inside shooting. Great explanation thanks Dan.
sue
|
|
|
|
08/04/2005 04:05:33 AM · #12 |
d'uh ......double post!!
Message edited by author 2005-08-04 04:06:44.
|
|
|
|
08/04/2005 05:18:23 AM · #13 |
Originally posted by suemack:
d'uh ......double post!! |
Well, it is a good thread for it. :D
David
|
|
|
|
08/04/2005 09:20:26 AM · #14 |
| A beanbag sitting on a surface of the appropriate hight does a wonderful job as a makeshift tripod. If you've got a larger / heavier camera you're probably better off shooting this way than wasting your money on a Wal-Mart grade tripod which will end up dropping your camera. If you must go out and purchase something to set your camera on, invest a buck or two in a beanbag, bag of rice, etc. |
|
|
|
08/04/2005 09:45:56 AM · #15 |
Okay, now I know why I hated school LOL. I got my lights yesterday and will have to wait for the cover of darkness to get this done tonight. Thanks Dan, hope to have the results withyou tomorrow.
|
|
|
|
08/04/2005 10:40:43 AM · #16 |
Results in by metoecus and keegbow are on the money.
sfalice is acceptable for the purpose but here you held the card over your face too long. You are not required to redo it if you are aware of what you did wrong. Simply study the results of metoecus and keegbow.
Once we get all the results in I will post an image of this principle taken to a natural end. We will then use this example in conjunction with your results to lay out the mechanics of the double exposure. From this moment on the double exposure and its technique will cease to be a mystery. Knowing this information will prepare you to conceive and execute your ideas.
For the beginners remember to compensate for the fact that you are using tungsten. If your camera has such adjustments, fine. Otherwise you will have to depend on the auto white balance. This is important in your regular work but not for this purpose. If you feel at a loss with white balance then put that on your list as your next goal. It is highly important if you enter challenges. I am certain that your manual has a small space dedicated to help you achieve this end.
Another note I wish to add. When I sold my studio I sold everything. Some weeks later I purchased 3 clamp lights, two months later a set of hot lights and then a set of strobes. I still use my clamp lights. Their use is universal. They can always be used for extra fill lights, modeling lights, safety lights. They are a very good investment and yes they are limited but they are almost indispensable. Not long ago, I bought 3 more. The image, "Fading away in Resolutionville was done with these lights. It is possibly the best investment you can make. Another vital piece of equipment is a tripod. This will serve you well with many of your challenge entries. Remember, the camera needs support. |
|
|
|
08/04/2005 11:45:43 AM · #17 |
Originally posted by graphicfunk:
Results in by metoecus and keegbow are on the money.
sfalice is acceptable for the purpose but here you held the card over your face too long. You are not required to redo it if you are aware of what you did wrong. Simply study the results of metoecus and keegbow.
... |
Just reporting in to say I did redo the exercise this morning and got it right this time.
Alice |
|
|
|
08/04/2005 06:25:08 PM · #18 |
ok, mask - no problem, tripod - got it, room to do the assignment - yep. But where do I find clamp lights? I have a trio of halogen worklamps, but they are 500W a piece and a bit bright for the longer exposure (amd my room isn't big enough to move them further back).
I've been looking around, but haven't found much. Some that I've found, may not be exact but are representative.
125W/250W Halogen work lamp -- more halogen so would work well with what I have, but would be even hotter.
small accent lights -- (sorry, not thumb) seems to be limited to 35W/60W bulbs
3-pack, 250W max Brooder lamps -- this looks good, get all three at once and could just use smaller bulbs if needed. Unfortunately I haven't found them locally yet (will look in larger neighboring town later tonight).
I'm sorry if I sound dumb, but what kind of clamp light are you suggesting? Been meaning to get some good lights, and now I have the excuse.
David
|
|
|
|
08/04/2005 06:26:24 PM · #19 |
I found mine at a 'mom n pop' hardware store...interior house painters use them, I think.
Message edited by author 2005-08-04 18:27:47. |
|
|
|
08/04/2005 06:32:24 PM · #20 |
Originally posted by Britannica:
But where do I find clamp lights? |
I assume Daniel means simple ones like this:
//www.toolking.com/grip/view.asp?id=3959
Home Depot and most hardware stores have 'em for about $5 (bulb extra)
Dave
Message edited by author 2005-08-04 18:32:34.
|
|
|
|
08/04/2005 06:37:54 PM · #21 |
Got mine from the local hardware, they have reflector dishes around them too, dont know if this is right or not but they should suffice.
Edit : look similar to the ones that were shown inthe link posted above.
Message edited by author 2005-08-04 18:39:35.
|
|
|
|
08/04/2005 08:13:49 PM · #22 |
Originally posted by Britannica:
ok, mask - no problem, tripod - got it, room to do the assignment - yep. But where do I find clamp lights? I have a trio of halogen worklamps, but they are 500W a piece and a bit bright for the longer exposure (amd my room isn't big enough to move them further back).
I've been looking around, but haven't found much. Some that I've found, may not be exact but are representative.
125W/250W Halogen work lamp -- more halogen so would work well with what I have, but would be even hotter.
small accent lights -- (sorry, not thumb) seems to be limited to 35W/60W bulbs
3-pack, 250W max Brooder lamps -- this looks good, get all three at once and could just use smaller bulbs if needed. Unfortunately I haven't found them locally yet (will look in larger neighboring town later tonight).
I'm sorry if I sound dumb, but what kind of clamp light are you suggesting? Been meaning to get some good lights, and now I have the excuse.
David |
+++++++++++++++++++++++++++++++++++++++++++++++++++++++++++++++++++++++
Look, these clamp lights are very ideal to have around. yes, I mean the omes with a reflector. You will always used them. However, those of you who have say 250 watts you can do the same ratio of 1:4 by placing the fitst light 5 feet from subject and second light 10 feet away. If space is a problem then bounce the strongeer lights off a white wall or white poster board. Just keep the relative proportions. |
|
|
|
08/04/2005 09:36:06 PM · #23 |
I don't think I had my lights setup up properly. I took the shots then came back upstairs and read the directions (typical for me...)
Dave
|
|
|
|
08/04/2005 10:24:33 PM · #24 |
[thumb]213947[/thumb] [thumb]213951[/thumb]
I'd do this over, but the dog ate my mask!
Message edited by author 2005-08-04 22:26:37. |
|
|
|
08/04/2005 11:06:45 PM · #25 |
Okay I hope you realise my camera isnt insured against damage caused from taking a photo of myself!!
1:4
[thumb]213958[/thumb]
1:9
[thumb]213959[/thumb]
|
|


