| Author | Thread |
|
|
07/26/2015 01:51:39 PM · #1 |
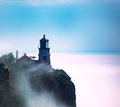
This shot is really important to me, on of my bucket list shots.. I am not entering this in any challenges, but we took awesome photos of the split rock one day and then on the way home, it was really, hazy and foggy and we captured some awesome fog images from one of the scenic overlooks.. I am having a very hard time editing fog and the haze, not sure what I am doing wrong with it..
I have the original on drop box and the link is below.. have fun!!!
I would also like to know what and how you edited it. I do plan on printing this one out on canvas when edited..> thanks for helping as always :-)) One of the reasons I want this printed out is because I have a puzzle of this exact lighthouse. I am planning on mounting them all on a wall as a collage together.
day 2 morning fog shot

drop box link
another fog shot that I liked as well

drop box link2
Message edited by author 2015-07-26 14:03:52. |
|
|
|
07/26/2015 02:20:34 PM · #2 |
| I will try this tonight after I put the kids to bed. Not guaranteeing results, but also find this type of photo challenging to edit. Will let you know what I come up with. |
|
|
|
07/26/2015 02:46:11 PM · #3 |

Nik Color Efex, tonal contrast setting
Then Nik Silver Efex, normal setting with contrast and structure increased, applied in Luminosity mode.
Cropped a little.
It seems if you try to do too much with the picture there are lots of sort-of-but-not-quite-circular blobs on your sensor - may be worth getting it professionally cleaned!
Nice pictures - glad to hear your trip went well. Congrats on the hummers, too. I have a feeder out front that one little territorial guy guards - he sets on top and won't let anyone else come feed. |
|
|
|
07/26/2015 02:50:13 PM · #4 |
|
|
|
07/26/2015 03:04:29 PM · #5 |
awesome and yes those are dust spots I did not realize the lenses were dirty when I uploaded them, I have a lot of cloning to do from it LOL!
Don't feel bad about not doing too much, push the image, I will clone them out no problem :0) I just don't know how to do the fog thing
Thanks guys that is much more better than what I can come up with.. Would love to see all other versions as well feel free to play as you want too!!!
The hummers were amazing thank you :-0) I loved the trip
Not a problem Darryl, I will be editing other photos I need printed as well, but won't be for a few weeks or so :-) No deadline on this one
Message edited by author 2015-07-26 15:06:37. |
|
|
|
07/26/2015 03:13:00 PM · #6 |
Just goofed with it in LR and PS all advanced editing rules. Mostly color adjustments, sharpening, dodge and burn.
 |
|
|
|
07/26/2015 04:34:12 PM · #7 |
| I really wanted to go to Split Rock the next time we visited my daughter in Minnesota. Then Target laid her off and she moved back home. I guess I'll never get to go. |
|
|
|
07/26/2015 05:19:16 PM · #8 |
Here is my take: //worth1000.s3.amazonaws.com/themeposts/635735422529366000/635735422529365956_8f72.jpg
Adobe Camera Raw + NIK.
Message edited by author 2015-07-26 23:04:47. |
|
|
|
07/26/2015 05:24:46 PM · #9 |
Opened the RAW file. Adjust contrast and exposure (slightly)
Used Lens Distortion (vertical)
Crop to 4x3
Then NIK Color Efex - Pro Contrast. Dynamic Contrast adjustment.
THEN, if it were mine I'd go monochrome and do something like this 
but YOU might prefer it in color so.
Color Efex Modern - Echtachrome
Topaz toned
And I come up with this  may be way overdone to your taste, if so you could skip the Topaz. may be way overdone to your taste, if so you could skip the Topaz. |
|
|
|
07/26/2015 05:49:12 PM · #10 |
Great capture! Here is my attempt. I've never tried to process someone else's image before. That was so much fun! :)

Imported RAW into Lightroom
Cropped
Global small changes in exposure (down) and contrast (up)
Made tiny s-curve
Split tone (yellow in highlights and blue in shadows)
Graduate filter in the sky
Lots of individual brush stroke adjustment to lighthouse, forrest and cliff so they would stand out more + increase exposure in fog to remove yellowness from split tone
Vignetting and extra brush stroke in bottom right corner
Sharpening
Exported to JPEG |
|
|
|
07/26/2015 08:54:28 PM · #11 |
WOW this is great, thank you everyone, this will be hard to choose what editing I like best hahah!
~~~~~
I do not have topez but I do have NIK collections :-))
I can also work from Photoshop or Lightroom as well |
|
|
|
07/26/2015 09:15:59 PM · #12 |

clean that sensor...(lol) but here's my take on it...PM me if you want to know the detail...I used Lr/PsCC & Nik...so all the tools from your belt. |
|
|
|
07/26/2015 11:04:59 PM · #13 |

My takes using LR/PS and Nik. I can send you the PS file if you want.
|
|
|
|
07/26/2015 11:07:53 PM · #14 |
|
|
|
07/26/2015 11:34:18 PM · #15 |
sure mark would love to see it! Thanks!!
yessss that sensor is dirty hahahah!
I am soo loving what you all are doing with it |
|
|
|
07/27/2015 08:30:01 AM · #16 |
| MarkB has done an excellent job here I think. |
|
|
|
07/27/2015 11:29:47 AM · #17 |
Originally posted by Tiny:
MarkB has done an excellent job here I think. |
Most definitely. |
|
|
|
07/27/2015 12:28:32 PM · #18 |
Originally posted by Tiny:
MarkB has done an excellent job here I think. |
Agreed! |
|
|
|
07/27/2015 12:30:07 PM · #19 |
Originally posted by MarkB:
My takes using LR/PS and Nik. I can send you the PS file if you want. |
I'd be curious about the specific actions you took to improve the sharpness on the building. Impressive work!
Message edited by author 2015-07-27 12:50:47. |
|
|
|
07/27/2015 04:13:56 PM · #20 |
| Glad I could be of help. I'll post my steps so everyone can see what I did. Hopefully I can get to it tonight. |
|
|
|
07/27/2015 04:58:22 PM · #21 |
Just spent the cash on NIK because of your edit! Thanks for spending my money...
;-P |
|
|
|
07/27/2015 05:01:02 PM · #22 |
Originally posted by thegrandwazoo:
Just spent the cash on NIK because of your edit! Thanks for spending my money...
;-P |
Best software you'll ever spend $$ on!!! |
|
|
|
07/27/2015 07:45:32 PM · #23 |
Tried one last one: //worth1000.s3.amazonaws.com/themeposts/635736374723759800/635736374723759777_d036.jpg
Started with my last edit and tried to add a fall feel to it.
Message edited by author 2015-07-27 19:47:33. |
|
|
|
07/27/2015 08:53:59 PM · #24 |
Here are my steps for editing the image. Fortunately I haven't edited another image yet so I have access to most of my settings
1. Import RAW into LR
2. Set the Dehaze slider to +67. This brought out the clouds, sky and horizon line. I then rotated the image to make the horizon that we found level and then sent the image to Photoshop for finishing.
3. As the image came in from LR the sky was a too much of a cyan color so I added a hue adjustment layer that targeted the cyan color range and shifted it to a more blue color. I don't have the exact settings I used as I was happy with the shift and applied the layer.
4. Used NIK Output sharpener with the following settings: Adaptive Sharpening: 19% Output Sharpening: 82% Structure: 63% Local Contrast: 15% Focus: 23%
5. I have my NIK set up to automatically create a new layer. So on the sharpened layer I created a mask and set my opacity to something (say 50% as I don't really remember) and masked out the trees and the fog in front of cliffs. I did not mask the very edge of the fog in front of the cliffs as I wanted that edge to be a little crisper.
6. Merged everything together and opened up NIK Color EFex Pro and applied the Pro Contrast Filter with the following settings: Correct Color Cast: 50% Correct Contrast: 50% Dynamic Contrast: 0%
7. Added a mask to the CEP Pro Contrast Layer and masked out the foreground trees at 100% , the middle trees at 50% or so and the sky area beneath the clouds and above the horizon at 25%. The 50% and 25% are just guesses from looking at the mask, not sure of the real numbers.
8. Created a new layer at the top of the stack and did some real quick cleanup of the sensor dust spots with the spot healing brush. I typically like to heal on a new layer with the brush set to sample all layers that way it is a non-destructive edit and I can undo things easier. Once I am happy with my healing I will merge layers.
9. Merged all the layers to create single combined layer. I used CTRL-ALT-SHIFT so I kept my original layers as well for reference.
10. Resized to 1200 pixels tall and did my final sharpening:
11. Unsharp mask: Amount: 65% Radius: 0.3 Threshold: 0
12: Smartsharpen: Amount: 92% Radius: 0.7 Remove Noise: 10% Remove: Lens Blur
Hope that helps and if you have any questions I will do my best to answer them.
|
|
|
|
07/27/2015 09:28:18 PM · #25 |
Thanks again everyone and especially to Janine and Mark,
this is a huge learning experience step for me... for those that wish for the Photoshop files that Mark created I now have that on my drop box, Mark has graciously gave permission to pass out for those that wish to look at it and learn from as well, I will PM the dropbox link from my drop box if wanted :-)
|
|
Home -
Challenges -
Community -
League -
Photos -
Cameras -
Lenses -
Learn -
Prints! -
Help -
Terms of Use -
Privacy -
Top ^
DPChallenge, and website content and design, Copyright © 2001-2024 Challenging Technologies, LLC.
All digital photo copyrights belong to the photographers and may not be used without permission.
Current Server Time: 04/23/2024 05:27:36 AM EDT.


