| Author | Thread |
|
|
02/03/2015 08:41:09 AM · #1 |
Tutorial
50 amazing photos of out of bounds
Out of bounds tutorial, I just found this as I was searching for a tutorial I needed, I really, really love this, so, I am sure some of you already played with this and I think we had a regular challenge on it but with borders..
I want to make this a side challenge to see what fun we can have with this I think it can be pretty fun and maybe help and crititque others as we go to get better at it. I want to see what you can create. What would you do with one photo?
I am in the process of creating my first one, having issues with that pen tool...
LET'S PLAY!
Message edited by author 2015-02-03 08:44:02. |
|
|
|
02/03/2015 03:06:30 PM · #2 |
| Those are amazing. Thanks for sharing. I think that they would require quite a bit of time but if it's a month long side challenge it should be doable. I'll play. |
|
|
|
02/03/2015 05:06:47 PM · #3 |
I am not going to put a time on this because this is taking me wayyyy over too much time to even figure out how the tools work in PS to accomplish this
I am thinking having this go for the full 2015 year :-))
Not like the flip and bends were it can be easily processed in minutes
Message edited by author 2015-02-03 17:08:17. |
|
|
|
02/04/2015 01:55:59 PM · #4 |
Thanks for the links and suggestion Julie! I followed the tutorial link you posted but I need more work using the pen tool.
So much fun!
 |
|
|
|
02/04/2015 06:00:59 PM · #5 |
Your welcome, I thought this was kinda fun and different to try out..
OOO WOW yours turned out soo awesome!!!
Really love it
I am having a hell of a time with the pen tool to get what I want LOL I am working on one of my eagle pictures, but I have to keep redoing it, should have it done in a few days
|
|
|
|
02/04/2015 08:08:21 PM · #6 |
hahah this is a lot of fun
I finally got it, I kept reversing the marquee tool and couldn't figure what I was doing with the layers, Finally got it through at least the concept, now I have to figure out how to do the gradient tool to make the bacground much cooler,
First try

Now to work on the background and play more with the Pen tool
Try two

Message edited by author 2015-02-04 20:29:13. |
|
|
|
02/04/2015 08:41:46 PM · #7 |
If you are all working in Photoshop I'm not sure why you are working with the (awkward) Pen tool and not just creating a mask (also known as a saved selection or an alpha channel). Use a selection tool to rough out the mask area, then after saving the selection use the paintbrush and eraser tools (the selection will appear as a grayscale image in the Channels palette) to fine-tune your selection.
The only "pen" I'd use is the stylus which came with my Wacom tablet, a big help in making accurate masks. The PS Pen tool is fine if you are creating an arbitrary shape with a mathematically accurate Bezier curve, but I find it a pain when trying to select existing objects.
I know there are a few existing entries here which use this technique, but I can't remember exactly which ...
ETA: Besides creating selections for compositing images, masks are extraordinarily useful is controlling the effects of adjustment layers (e.g. Curves) and local effects (e.g. sharpening, blurring). We have multiple tutorials here concerning how to create and use masks.
Message edited by author 2015-02-04 20:46:38. |
|
|
|
02/04/2015 08:47:42 PM · #8 |
aaaaa that might be much easier and faster, I will have to learn this trick :-)) Not sure how though, I will search for the tutorials, thank you
Message edited by author 2015-02-04 20:59:07. |
|
|
|
02/04/2015 08:51:51 PM · #9 |
Originally posted by jgirl57:
aaaaa that might be much easier and faster, I will have to learn this trick :-)) Not sure how though, I will search for the tutorials |
Post a DPC-sized image in your workshop and tell me what you want to do, and I'll make you a mini-tutorial on how I would do it. (Probably can't finish tonight though -- I work in the early morning.) |
|
|
|
02/04/2015 09:00:26 PM · #10 |
ok :-)) I will message you
Message edited by author 2015-02-04 21:09:20. |
|
|
|
02/04/2015 09:23:20 PM · #11 |
Thanks Paul! I was fighting with the pen tool. The tutorial that I watched said it was a great way to do the selection. I have no idea how to use masks but I will look up the tutorials on the sight tomorrow and see what I can learn.
Julie nice job on the eagle! I hear ya about the gradient tool and the pen!! :-)
Thanks again to both of you! |
|
|
|
02/04/2015 10:05:38 PM · #12 |
| somethings got to be easier for the backgrounds LOL! |
|
|
|
02/04/2015 11:01:40 PM · #13 |
Had to try the other way and direction this is what I had came up with
Now to work and play with these two wtih backgrounds and to fine tune things a bit. Not liking the back or the ears on this one, so I have to work on it some more

Message edited by author 2015-02-04 23:02:28. |
|
|
|
02/05/2015 04:20:48 PM · #14 |
Starting with this image*  and using selection tools and saved selections/masks (a.k.a. alpha channels). and using selection tools and saved selections/masks (a.k.a. alpha channels).
*NOTE: If I was starting with my own image I'd have saved the "frame" as a separate selection, where it could be used to modify subsequent selections with perfect accuracy, rather than having it be already composited into the base image.
Since the frame is already present, I used the Polygonal lasso tool to make a rough selection around the frame. Invert the selection (so it's everything except the frame area) and save the selection -- name it "outside"
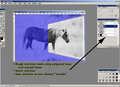
Since its edges are straight, I could have zoomed-in the view and selected them precisely (see a later step), but I didn't; this will allow demonstration of another useful technique.
Choose the saved selection ("outside" in the Channels Palette) and make it visible. Use the paintbrush tools to fill in the gaps around the frame.

Use the polygonal lasso again to make a rough selection of the head and fill it with black. Make sure you are editing the "OUTSIDE" channel and not any of the color channels. Deselect, and then zoom in and use soft-edged brushes to paint in the fine details of the mask over the head. The was little contrast between the horse's mane and the background, so that selection is rather crude, just to give you the idea. Also, I found the best contrast/easiest editing with only the Red channel and the mask visible.
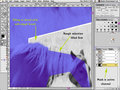
Zoom in and use the polygonal lasso to select the inside of the frame. Save the selection as "inside".

Load the selection "inside" Load the selection "outside" with the option "Subtract from Current Selection" checked. Save the selection as "inside" replacing the previous version.

I took an old photo of mine and distorted it to approximate the perspective of the frame, and copied that to the clipboard.
Back in the main file, load the selection "inside" and use Edit > Paste Into to put the copied file into the mask; scale and move it around to fit.. I also cloned-out a bit of the horse's leg below the frame, but I didn't clone out the bit of grass just above.
I didn't try to separate the horse from the outside background, but it I hope it's clear how to use one or more other channels to isolate the horse and outside background completely.
 |
|
|
|
02/05/2015 04:27:43 PM · #15 |
| I'm going to suggest Topaz Remask for this. SOOO easy. |
|
|
|
02/05/2015 04:31:09 PM · #16 |
Originally posted by Cory:
I'm going to suggest Topaz Remask for this. SOOO easy. |
Will it run under Windows 2000 or Mac OS 8.6? ;-) |
|
|
|
02/05/2015 04:34:59 PM · #17 |
Originally posted by GeneralE:
Originally posted by Cory:
I'm going to suggest Topaz Remask for this. SOOO easy. |
Will it run under Windows 2000 or Mac OS 8.6? ;-) |
:) No. |
|
|
|
02/05/2015 04:36:33 PM · #18 |
Great idea, I look forward to seeing what everyone comes up with.
Years ago, I had a quick play with this, and I keep telling myself that I'll have another go some day LOL

Julie, don't give up on the pen tool completely. It is never my first choice, but once you know how to use it, there are times where it is the quickest and most accurate (when all the other methods are being iffy). |
|
|
|
02/05/2015 04:50:29 PM · #19 |
Originally posted by Cory:
I'm going to suggest Topaz Remask for this. SOOO easy. |
I never have much luck with Remask. Assuming it's me, because I know several people who love it. |
|
|
|
02/05/2015 05:20:14 PM · #20 |
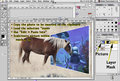
Thanks Karin!!! Your the one that taught me how to use the pen tool in the first place and I remembered how!! I just forgot how difficult it was to do the curves until I remember you teaching me then the lightbulb came on for me as I was doing it the second time around, I am kinda enjoying it but have to practice it wayyy more
Thank you Paul!!! I can't wait to try this masking type! I am excited to play with it Thank you for taking out the time for the quick tutorial on that, I appreciate it..
The horse is a wild mustang named Yellow belly in Wyoming of when I ended up taking and spending time with my horses, He was the head honcho stallion of that herd
Message edited by author 2015-02-05 17:22:08. |
|
|
|
02/05/2015 05:49:14 PM · #21 |
Originally posted by Elaine:
I never have much luck with Remask. |
Ditto. I think remask works perfectly in cases where the magic wand and the quick selection tool work perfectly, also.
When those two don't work, remask seems to be a LOT of work to get right, also.
The hard bits like fly-away hair are difficult, no matter what! But a hard edge with very low contrast (say a person in dark clothes in front of a dark background) are the times I get out the pen tool, instead. At least you can rely on that to be accurate. |
|
|
|
02/06/2015 09:01:18 AM · #22 |
The remask thing is a great tool and I am glad to learn both of them...
I am trying something new with backgrounds hoping it works but it is very challenging |
|
Home -
Challenges -
Community -
League -
Photos -
Cameras -
Lenses -
Learn -
Prints! -
Help -
Terms of Use -
Privacy -
Top ^
DPChallenge, and website content and design, Copyright © 2001-2024 Challenging Technologies, LLC.
All digital photo copyrights belong to the photographers and may not be used without permission.
Current Server Time: 04/16/2024 06:28:15 AM EDT.


