| Author | Thread |
|
|
05/10/2016 04:40:55 PM · #1 |
Having looked around online and failed to find anyone else having carried out this repair and posted about it on the internet, I decided to post here about it for posterity in case anyone needs to carry out the same procedure.

This should apply equally to the 1D Mark III, 1D Mark IV, 1D X and 1D C.
It's not the same as replacing the top LCD glass on a 5D series, or the earlier 1D series - there's now a second protector band around the top edge which has to be removed first, and there's no securing tab under the bodywork.
This is the only relevant bit of diagram from the 1D Mark III service manual:

This is a worthwhile repair to do - these LCD covers scratch and break easily. I've no idea how much Canon would charge for this repair, but you can get the replacement glass for a tenner, and it's not likely to be that cheap with Canon doing it.
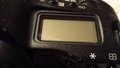
Start with cracked top LCD:
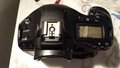
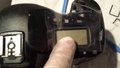
First thing to know is you do not need to use heat, unlike on some other bodies - so put away that hairdryer. Use just a plastic pry tool to lift up the edge of the black surround from the left side - be careful because this bit is fragile, pry it up carefully as you go round to prevent breaking it:
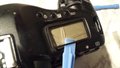
You need to keep this piece safe, so clean off any mess carefully and leave it aside. You'll need to keep the adhesive that's on it and reuse it, unless you supply your own, because the replacement glass won't come with this part. You now see the glass, with a stepped ridge in it, and the double sided tape underneath holding it down:

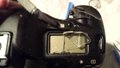
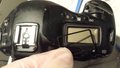
Use a craft knife or another sharp implement to carefully lever the glass up away from the body, again starting from the left side. If the glass is broken, you can actually use this to your advantage to lever it out in smaller pieces, lifting them out with tweezers or small pliers. Make sure you go around the original frame and carefully scrape off any remnants of the original tape - your new glass will come with adhesive tape already attached.
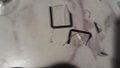
Shake / blow out any debris and dust from the top of the lcd, but avoid touching it directly. This is the mess of leftover broken glass and stripped tape:
Take off the adhesive backing from the new screen, but keep the transparent plastic on to make it easier to position it and press it into place. It seems to be symmetrical, so it fits in either orientation. Make sure you get it the right way up, though! The sticky stuff must be on the bottom, and the stepped inset on the top. It's a good idea to wear nitrile or powder-free latex gloves while handling this glass to avoid getting dust or an akward fingerprint on the underside, where you'll have to look at it forever. Use the plastic sheet to carefully position and drop the glass into place, and then press it down firmly all around to make sure it's seated and stuck down very well - be thorough here, as this is one of the key parts for keeping the rain out of the electronics.
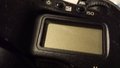
Peel off the plastic and admire your handywork. If your positioning isn't perfect, now is the time to peel this back up and re-seat it.
Re-position the surround in the groove around the glass, making sure it's the right way up - the top is smooth, and you'll see the original adhesive still stuck to the underside making it look rough. Again, use gloves:
Press it firmly into place going all the way round, admire your shiny new screen, and congratulate yourself on saving a bit of cash on repairs.
Message edited by author 2016-05-10 16:50:32.
|
|
|
|
05/10/2016 06:09:08 PM · #2 |
| Good to see you around again, Gene. It's been way too long. Thanks for the awesome, straightforward little tutorial. |
|
|
|
05/10/2016 07:14:24 PM · #3 |
Originally posted by riot:
... avoid getting dust or an awkward fingerprint on the underside, where you'll have to look at it forever. |
From the "Make a Bug a Feature by Documenting It" Dept.:
You could perform this accident "on purpose" and have a way to uniquely identify your camera without having to write down the serial number in case of any ownership dispute ... |
|
|
|
05/10/2016 07:17:34 PM · #4 |
|
|
|
05/10/2016 07:25:31 PM · #5 |
Thanks bunches for the tutorial!
HOW did yours become cracked?
|
|
|
|
05/10/2016 09:17:25 PM · #6 |
Originally posted by Bear_Music:
Good to see you around again, Gene. It's been way too long. |
Wow, I'm genuinely surprised that anyone here remembers me! It's good to be back; hopefully I'll be submitting regularly again. This place is a lot quieter than it used to be though, huh?
Originally posted by Lydia:
HOW did yours become cracked? |
This one came from ebay this way - saved me a lot on the purchase price compared to an unmarked one! Seems most people are terrified of trying even simple repairs like this, so nobody wanted to bid on a body with cracked glass.
|
|
|
|
05/10/2016 10:08:03 PM · #7 |
Originally posted by riot:
Originally posted by Bear_Music:
Good to see you around again, Gene. It's been way too long. |
Wow, I'm genuinely surprised that anyone here remembers me! It's good to be back; hopefully I'll be submitting regularly again. This place is a lot quieter than it used to be though, huh? |
Yeah, the internet got a lot bigger :-( But we're making some rule changes and we're gonna keep having league play, and we're hoping to entice some of the Old Guard back to help make the new folks feel welcome :-) |
|
|
|
05/11/2016 03:58:45 AM · #8 |
I always take on repairs like this, fun, and saves you a bag full of cash ;) good job Gene.
Bear - we need to get the league rolling again real soon, my lenses are getting dusty. |
|
Home -
Challenges -
Community -
League -
Photos -
Cameras -
Lenses -
Learn -
Prints! -
Help -
Terms of Use -
Privacy -
Top ^
DPChallenge, and website content and design, Copyright © 2001-2024 Challenging Technologies, LLC.
All digital photo copyrights belong to the photographers and may not be used without permission.
Current Server Time: 04/20/2024 03:46:17 AM EDT.


