| Author | Thread |
|
|
08/24/2008 02:02:43 PM · #1 |
I just wanted to throw out a great big
THANK YOU
to all the people that helped me in this thread. You guys ROCK!! :) |
|
|
|
03/12/2008 01:30:57 PM · #2 |
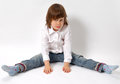
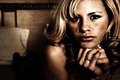
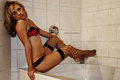
Here is three of my most recently edited. Just took three portraits...two are the same with different editing. All comments (constructive) welcome. These were taken with the work lights mentioned below (2-500W) in the first two images (same image0 they she was on the floor and the lights were right in front of her with one slightly to the side and both slightly angled up at her. The last one she was on top of the refridgerator. Both lights were about 3 feet below her angled up at her. It was orginally too dark, but the levels adjustment layer really gave it the look it has now....along with a duplicate layer, soft blend mode.


 |
|
|
|
03/10/2008 08:32:03 AM · #3 |
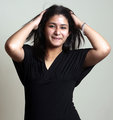
| I had have to say you did a great job of lighting. I know that the hardest part of lighting a person of color is capturing the shadows under the eyes. When I modeled several photographers had issues of getting the right amount of light under my eyes in natural light....so a reflector from below can be your best friend. |
|
|
|
03/07/2008 09:48:53 PM · #4 |
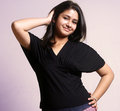
This is an example of natural light through a window...any tips for lighting a person of color?
 |
|
|
|
03/07/2008 09:26:55 PM · #5 |
Originally posted by Tez:
the aperture controls the studio lights. The shutter speed only matters if there is ambient light involved. |
That is a problem area for me coz its a makeshift studio in a room so full of windows. i need dark thick curtains i guess.
Message edited by author 2008-03-07 21:27:45.
|
|
|
|
03/07/2008 10:55:11 AM · #6 |
if your lights give a weird color cast all the time, why not stick a gel in front of them? In your case you'll probably want blue or green.
No more PS work. Problem solved!
Or just shoot b/w ;) |
|
|
|
03/07/2008 10:37:00 AM · #7 |
Originally posted by Tez:
the aperture controls the studio lights. The shutter speed only matters if there is ambient light involved. If you're in the studio the shutter speed is (most of the time) irrelevant. |
That is great info! I always wondered about it. Thank you! :)
I'm glad this thread is back!!!
|
|
|
|
03/07/2008 08:53:02 AM · #8 |
Originally posted by Tajhad:
Anthony
A question about your "work lights". Was the 500w too strong - did you soften them with anything ? Was there other lighting around (daylight? roomlight etc)? |
The work lights take some time to get used to working with. Alot of times they produce a yellow glare that I have to work with. At the right distance I keep the light from being too harsh on her and since i use two I never use them both straight on. One is always coming from some sort of angle. Sometimes I'll use the flash to compliment the lights. I learned the value of my levels adjustment layers (auto levels) during this shoot. The two portraits iwth the darker backgrounds were taken too dark (I'll try to edit and show the original later). I only kept them to play around...I used the levels adjustment curves and it gave me a great effect that i had never expected and ended up being two of my favorite of the shoot.
The one in the shower, i think I used my flash also. I ended having to take some yellow (hue/sat layer) out of the tiles. And then a curves layer to lighten them some. Although not necessary (but I like doing often with most of my editing) I'll make a duplicate layer and blend in softening mode. All it really does for me though is give it a deeper contrast and bring out the colors more.
We were in a motel room that was made for couples so the lighting was really dark. I found that when I cut off all other light except for my work lights, I got a better effect and less interference (difference in lighting color on her face). Another thing that I could have done prior to shoot or in raw conversion was change the white balance to flourescent lights to give a more natural look...but that would have been to easy and I like torturing myself in post processing...lol.
I often find that I need both lights and have one at eye level or something close and the other from an angle. I plan on putting more pictures on my website from that shoot and another shoot that I did in a hotel suite with the same lights in a few days. I'll post a link to them when i do so you can see different lighting used with them.
So the work lights work good for a cheap solution and they can stay in the trunk of my car. once I finally buy a house then I'll start looking at getting studio lights. |
|
|
|
03/07/2008 08:42:38 AM · #9 |
I left a comment on the third photo. I'd like to know what shutter speed, aperture, and ISO you were using for the third photo.
For the other two. I agree with Tez. You have to much harsh light on her forehead cheek and nose. Maybe pulling the light back slightly or softening the light some would help. The heal brush would be a good thing too. The pose and angle are great for the type of shot and her smile. The backgrounds are great too. |
|
|
|
03/07/2008 08:27:02 AM · #10 |
the aperture controls the studio lights. The shutter speed only matters if there is ambient light involved. If you're in the studio the shutter speed is (most of the time) irrelevant.
As for diffusing- yes it would help. Or set the softbox as far away from the light as you can on the stand to maximise the diffusion.
|
|
|
|
03/07/2008 08:25:04 AM · #11 |
Originally posted by edmeng:
Thanks for this thread, Cindi.
Tons of useful information here.
Here is my home-studio tryout:
White paper background, lit with one strobe with umbrella on the left side and big white reflector on the right. Very little post processing: rotate, crop, USM.
 |
Here is the comment I left on the photo:
I actually don't mind the shadow. I think it gives the picture some depth. I also think getting some of it on the right side of the face adds to the emotion. |
|
|
|
03/07/2008 08:13:47 AM · #12 |
Originally posted by Tez:
suggestions: soften the light, there's too many burnt out hotspots on the model (forehead, arms, nose).
Pick the focus point nearest to the eye if you can.
Stop down to about F6 on the 50mm where it is at its sharpest. |
You are right about the highlights and thats what my problem is. My light can operate either at 250W or at 125W. These pictures were shot at 125W with a 24' softbox kept at about 5-6 ft from the model. I have a few questions here:
- If i stop down to F6 how to i reduce the light as i can't increase the shutter speed beyond 1/200
- If i move the light back, the shodows will get more pronounced since the back wall is hardly 3 feet away? Will putting more diffusers help? What is 'normally' the distance of light from the subject for images like these?
Stopping down to F6 will require further than this
Message edited by author 2008-03-07 08:14:00.
|
|
|
|
03/07/2008 07:23:29 AM · #13 |
Anthony
A question about your "work lights". Was the 500w too strong - did you soften them with anything ? Was there other lighting around (daylight? roomlight etc)?
|
|
|
|
03/07/2008 06:07:32 AM · #14 |
suggestions: soften the light, there's too many burnt out hotspots on the model (forehead, arms, nose).
Pick the focus point nearest to the eye if you can.
Stop down to about F6 on the 50mm where it is at its sharpest.
Don't half-press the shutter then move around because you'll lose the focus. This is probably patronising you :)
If you can't help the burnt out spots, stop down your aperture until you can get the detail back in the highlights, then work the shadow detail back in in the raw conversion.
your placement, posing etc is perfect but the hot spots distract me... it could be her skin though...
Also, the spot healing brush laughs at zits if you want to clear her skin up a bit. She will probably appreciate that when she looks back at the picture in a few years time. |
|
|
|
03/07/2008 05:52:45 AM · #15 |
Hello everyone, just got hold of this very informative thread and a huge thanks to  idnic. I just bought my first studio strobe a few days back and tried to shoot a few portraits. Just wanted to share them with you coz i feel many things missing here but am unable to sort them out. The light was placed abt 45 degrees and above the model's height. Due to lack of space, she is standing abt 3 feet from the wall idnic. I just bought my first studio strobe a few days back and tried to shoot a few portraits. Just wanted to share them with you coz i feel many things missing here but am unable to sort them out. The light was placed abt 45 degrees and above the model's height. Due to lack of space, she is standing abt 3 feet from the wall
This one is taken in the daylight coming in from the window but appears rather soft

any suggestion for the next 'learn shoot' that i am planning in a day or two?
|
|
|
|
03/07/2008 04:26:43 AM · #16 |
I like the pic, but not the shadow. Can you get another light on the background, or move her away from the wall a little bit? A lack of shadow would make it look seamless.
Cool pic though :) makes me want to get a white background. |
|
|
|
03/06/2008 04:01:54 PM · #17 |
Thanks for this thread, Cindi.
Tons of useful information here.
Here is my home-studio tryout:
White paper background, lit with one strobe with umbrella on the left side and big white reflector on the right. Very little post processing: rotate, crop, USM.
|
|
|
|
03/06/2008 03:44:25 PM · #18 |
Originally posted by idnic:
Originally posted by albc28:
Tez I like the lighting on the shot. Very good lighting. Can't say I'm too fond of the crop though. The shadows created give it a very edgy look to it though. |
To add to that..... a rule of thumb I learned ages ago is "Never crop a chin if you can help it. The chin tells you a lot about the person's face and helps make people more recognizable. The forehead, however crop all you like as it gives us much less information about the identity of the person" Now, rules are meant to be broken, but I find this one makes sense to me and so I try to stick with it. |
no no i totally agree but the camera was on tripod and I was clicking away with the remote. This was the best I had, if i was shooting someone else for sure it would've been cropped/composed much better.
|
|
|
|
03/06/2008 02:56:38 PM · #19 |
| thanks for bumping this! I need it! |
|
|
|
03/06/2008 01:52:25 PM · #20 |
Originally posted by albc28:
Tez I like the lighting on the shot. Very good lighting. Can't say I'm too fond of the crop though. The shadows created give it a very edgy look to it though. |
To add to that..... a rule of thumb I learned ages ago is "Never crop a chin if you can help it. The chin tells you a lot about the person's face and helps make people more recognizable. The forehead, however crop all you like as it gives us much less information about the identity of the person" Now, rules are meant to be broken, but I find this one makes sense to me and so I try to stick with it.
|
|
|
|
03/06/2008 01:49:27 PM · #21 |
Originally posted by Tez:
[thumb]654116[/thumb]
Lit with a stofen omnibounce about 3 feet from my head and at about 60 degrees.
I used the Stofen to try and get the wraparound effect without having to resort to an umbrella as they're a bit clumsy to move around. The OB works great for singles and couples but it'll sap your batteries if you're trying to do group shots from a stand. You can bounce it off the cieling and it looks pretty nice too (it's named for it after all).
I thought about adding a hard backlight too but liked the way the black was arcing across and I feel the effect from a backlight would have been out of keeping with the photo.
This editing is going to feature prominently on my band shoots. |
Tez I like the lighting on the shot. Very good lighting. Can't say I'm too fond of the crop though. The shadows created give it a very edgy look to it though. |
|
|
|
03/06/2008 11:22:04 AM · #22 |
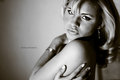
[thumb]654116[/thumb]
Lit with a stofen omnibounce about 3 feet from my head and at about 60 degrees.
I used the Stofen to try and get the wraparound effect without having to resort to an umbrella as they're a bit clumsy to move around. The OB works great for singles and couples but it'll sap your batteries if you're trying to do group shots from a stand. You can bounce it off the cieling and it looks pretty nice too (it's named for it after all).
I thought about adding a hard backlight too but liked the way the black was arcing across and I feel the effect from a backlight would have been out of keeping with the photo.
This editing is going to feature prominently on my band shoots. |
|
|
|
03/06/2008 11:15:42 AM · #23 |
Cindi thank you for bumping this. I have noticed recently lots of talk about studio lighting. Although I never got involved earlier in this thread I will now go back and read it from the beginning. I will then have my model come by and try and get some shots in that I can upload. Like you said practice, practice, practice.....
|
|
|
|
03/06/2008 11:10:53 AM · #24 |
Okay...I'll be the first to post for 2008. Here are a couple of photos that I just finished editing last month. These were all using two 500 Watt work lights, 1 250 Watt work light, and sometimes the flash. I don't have the originals handy because i'm at work, but i'll add more detail to each photo (aperture, shutter, etc...) when I get a chance

 - same as this one with different editing - same as this one with different editing 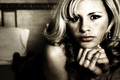
Message edited by author 2008-03-06 11:12:11. |
|
|
|
03/06/2008 10:52:51 AM · #25 |
|
Home -
Challenges -
Community -
League -
Photos -
Cameras -
Lenses -
Learn -
Prints! -
Help -
Terms of Use -
Privacy -
Top ^
DPChallenge, and website content and design, Copyright © 2001-2024 Challenging Technologies, LLC.
All digital photo copyrights belong to the photographers and may not be used without permission.
Current Server Time: 04/18/2024 09:01:46 AM EDT.


